
Do you want more organic search traffic to your site?
I’m willing to bet the answer is yes – we all do!
Organic search traffic is critical for growing your website and business.
Some research claims around 53% of your site’s traffic can be attributed to organic search.
But the stats don’t matter much if your site doesn’t show up in the search results at all.
How do you get your new site or blog indexed by Google, Bing, and other search engines?
Well, you’ve got two choices.
You can take the “tortoise” approach – just sit back and wait for it to happen naturally, but this can take weeks or months.
(Trust me, I’ve been there before – not fun.)
Or you can make it happen now, giving you more time and energy to put towards increasing your conversion rate, improving your social presence — and, of course, writing and promoting great and useful content.
I don’t know about you, but I’d rather get my sites indexed as quickly as possible because it gives me more time to build my audience.
These strategies are exactly how I grew this blog to over 600,000 monthly visitors as fast as I did!
Want to do the same thing?
Stick around, because I’m spilling the beans on everything I’ve learned about SEO and how to get your website indexed fast in this step-by-step guide!
I’m going to walk you through how to get Google to index y our website quickly, which will bring you more organic search traffic and higher rankings.
Let’s get started!
Why Do You Need Google to Index Your Site?
First, the obvious answer.
If you want your site to show up in the search results at all, then it needs to be indexed.
However, you don’t want your site to be indexed just once. You want the search engines to keep re-indexing your site.
Search engines like Google don’t just update automatically.
They rely on spiders — little bits of computer code that each search engine sends out to “crawl” the web (hence, “spider”).
You want an efficient, frequent crawl rate.
The spider’s job is to look for new stuff on the web and update the already indexed version of your site. That “new stuff” can be a new page on an existing site, a change to an existing page, or an entirely new site or blog.
Once the spider finds a new site or page, it needs to figure out what that new site or page is about.
Way back in the Wild Wild West of the early web, search engine spiders weren’t nearly as smart as they are today. You could force a spider to index and rank your page based on nothing more than how many times a particular search phrase (“keyword”) appeared on the page.
For today’s content success, you can’t rely on these old school search engine optimization strategies.

The keyword didn’t even have to be in the body of the page itself. Many people ranked for their biggest competitor’s brand name just by stuffing dozens of variations of that brand name in a page’s meta tags!
Fortunately for Google search users and ethical website owners, those days are long gone.
Today, keyword and meta tag stuffing will get you penalized, not rewarded. And meta keyword tags aren’t really part of the algorithm at all (though there are still good reasons to use them).
If you’re not careful, you could get your site kicked out of the index altogether — which means your site won’t rank for any keywords at all.
These days, Google is more concerned with the overall user experience on your site and the user intention behind the search — i.e., does the user want to buy something (commercial intent) or learn something (informational intent)?
They even made Page Experience a ranking factor.
Don’t get me wrong — keywords still matter. Other factors are also important — up to 200 altogether, according to Brian Dean of Backlinko. These include things like quality inbound links, social signals (though not directly), and valid code on all your pages.
None of that will matter if the spiders can’t tell the search engines your pages are there in the first place, meaning they won’t show up in search results.
That’s why website indexing is so important.
To put it simply, indexing is the spider’s way of gathering and processing all the data from pages and sites during its crawl around the web.
Frequent indexing improves your search results.
The spider notes new documents and changes, which are then added to the searchable index Google maintains. Those pages are only added if they contain quality content and don’t trigger any alarms by doing shady things like keyword stuffing or building a bunch of links from unreputable sources.
When the spider sees a change on your website, it processes both the content (text) on the page as well as the locations on the page where search terms are placed. It also analyzes the titles tag, meta tag, and alt attributes for images.
That spider then adds, or “indexes”, that content into Google.
That’s indexing in a nutshell. It is an essential webmaster tool.
When a search user comes along looking for information by typing in search keywords, Google’s algorithm goes to work. The algorithm then decides where to rank a page in comparison to all the other pages related to those keywords.
How often your site is indexed can affect your performance in search results. You want to make sure all your latest content is available for those searching and Google’s spiders at all times.
That’s the short and somewhat simplified version of how Google finds, analyzes, and indexes new sites like yours.
Many other search engines, like Bing or Yahoo, follow similar procedures, though there can be variations in the specifics as each has its own algorithm.
What Website Indexing Factors Matter?
You want an efficient index rate for your website.
That means you want search engine spiders to find your new content as quickly as possible after you hit publish.
You can check how often Google is crawling your pages by logging into Search Console.
Not set up with Google Search Console yet? Jump down to Step 2 to learn how to get your website set up.
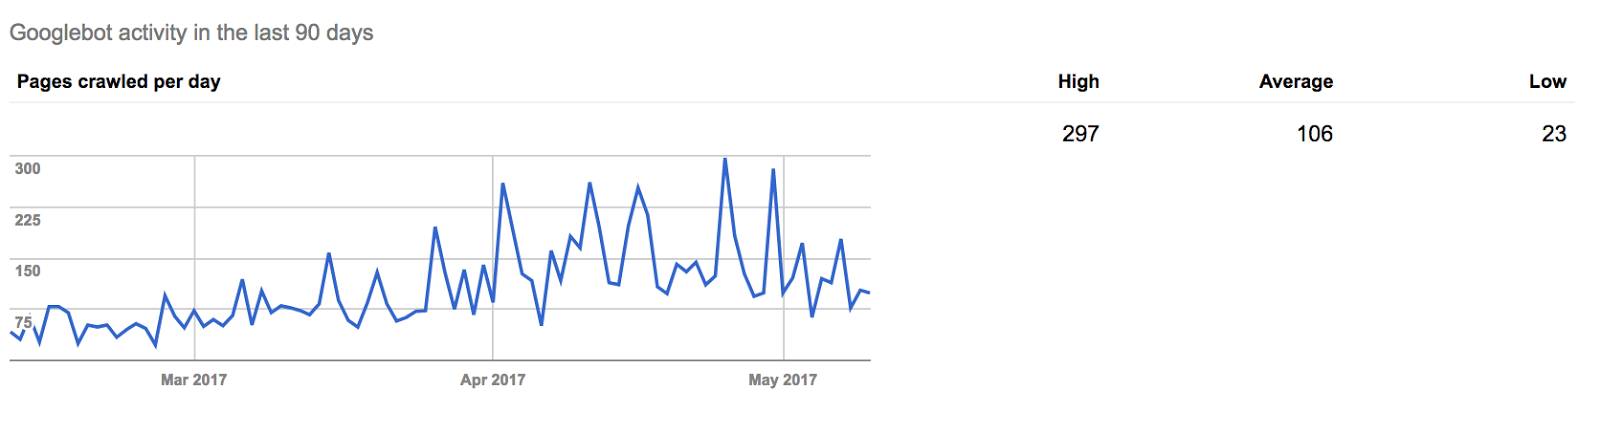
In Search Console, click on your website. Then click on Settings > Crawl Stats > Open Report. You’ll see some graphs like this:
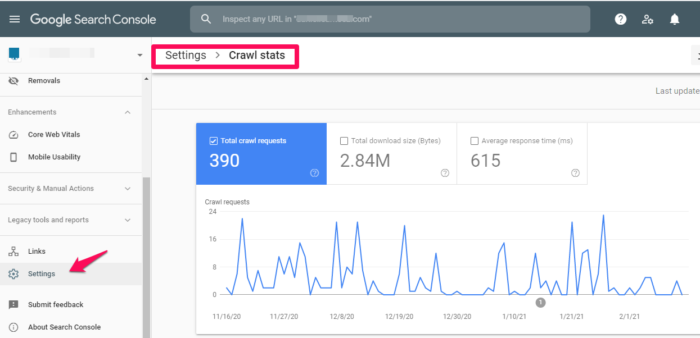
The first graph shows how often Google is crawling your site.
That graph — the “Crawl requests” one — shows how often Google is crawling my site each day.
As a rule of thumb, the more crawling the better.
There are some cases, however, where too much crawling can overload your server resources. Typically it’s the result of a server misconfiguration instead of an issue with Google’s spiders.
This is very rare though, so you probably won’t need to worry about this. Google allows you to change the crawl rate (only down, not up) if this is happening to you.
So how did I increase my crawl rate?
I’ve been posting a lot lately and updating older content, so Google is eager to get all my updates and changes as fast as it can. It’s learning to check in with me more often.
I also switched to a new web host in April that is much faster than my old one.
The faster your site loads, the faster Google can come in and index it!
Google wants to recommend the best websites to its users. It looks for sites that offer a good user experience. While that includes many factors, quality content and site loading speed is highly important.
To put it simply:
Faster site = better user experience.
Better user experience = higher search result rankings.
More important than how often Google indexes your site is how many pages it’s indexing. You want to ensure as many of the pages on your site as possible are indexed.
(Don’t worry, your sitemap will take care of that, which I cover in detail in Step 7.)
But first, let’s start at the beginning. The following 18 steps will guide you through everything you need to know about getting your website indexed.
You don’t necessarily need to do all 18 steps to have a well-indexed website, but if you’re wondering how to rank higher in Google, this is the only guide you’ll ever need!
Step 1: Is My Site Indexed Already?
Unless you’re starting a brand new site, your website is probably already indexed.
If you’re not sure, here’s how to find out.
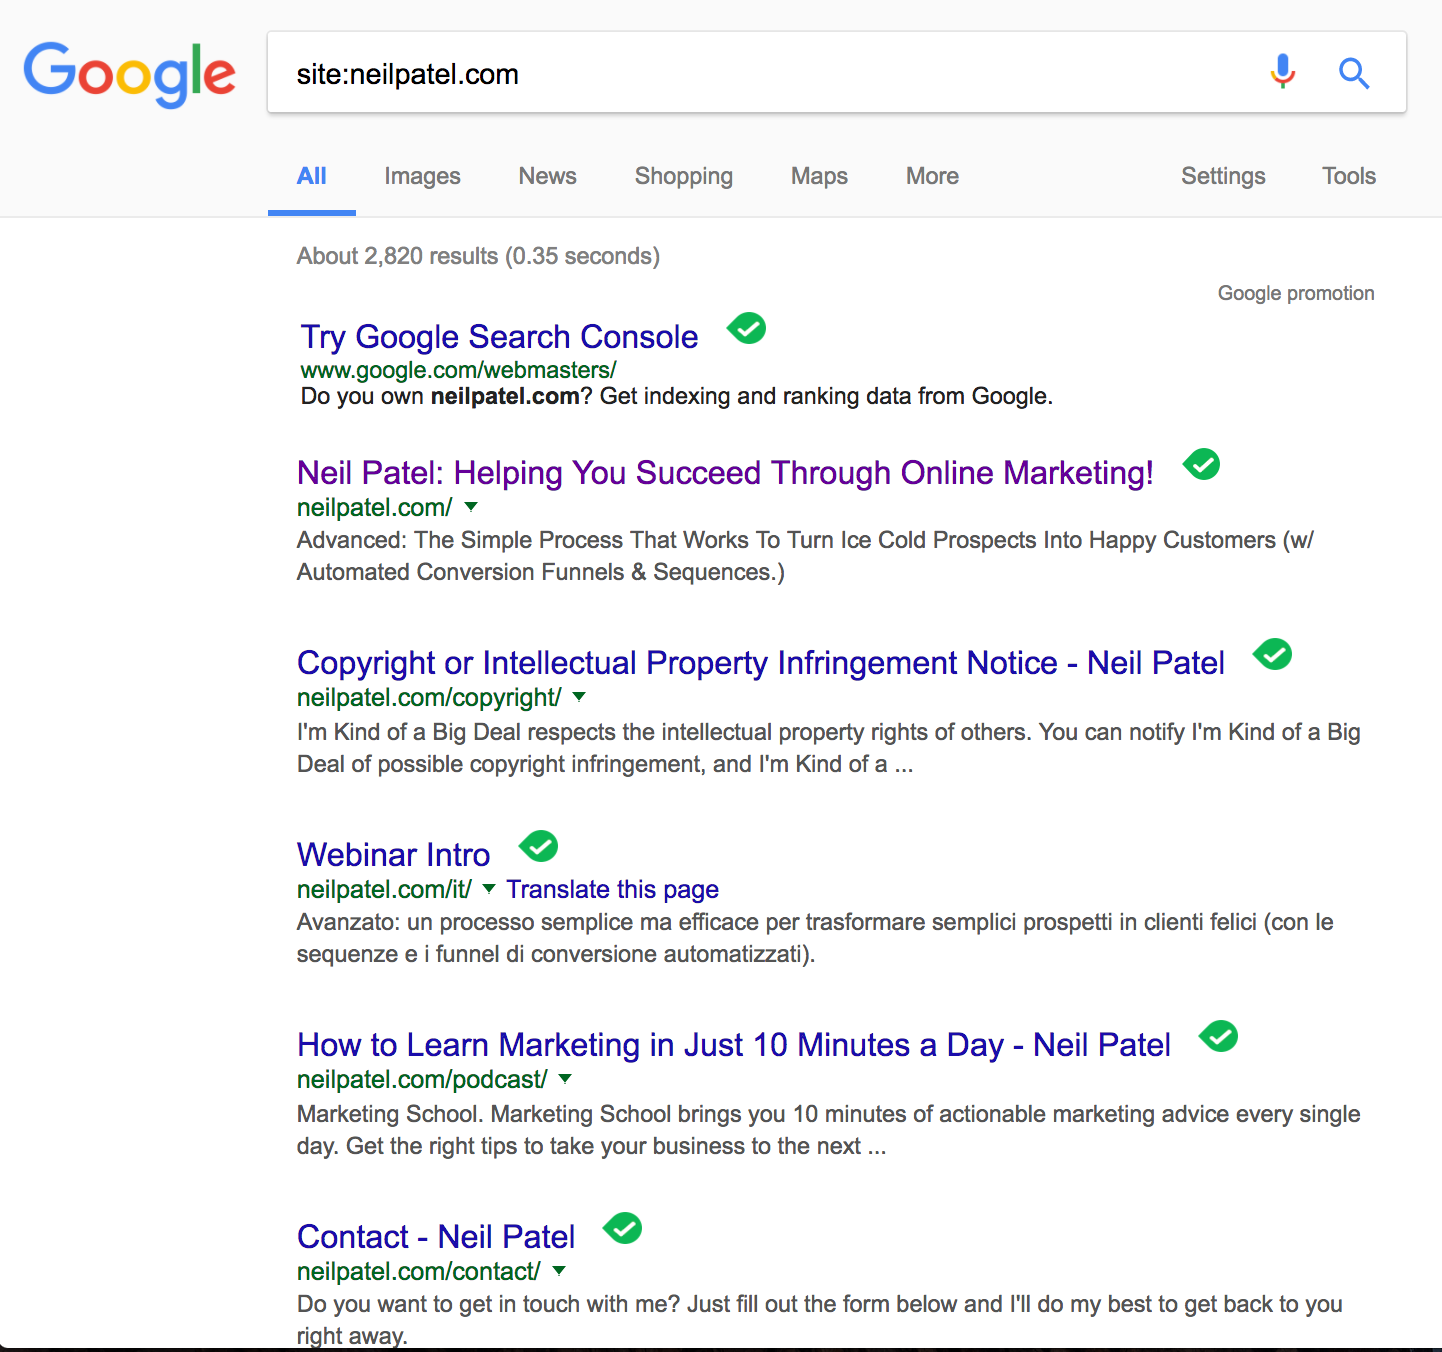
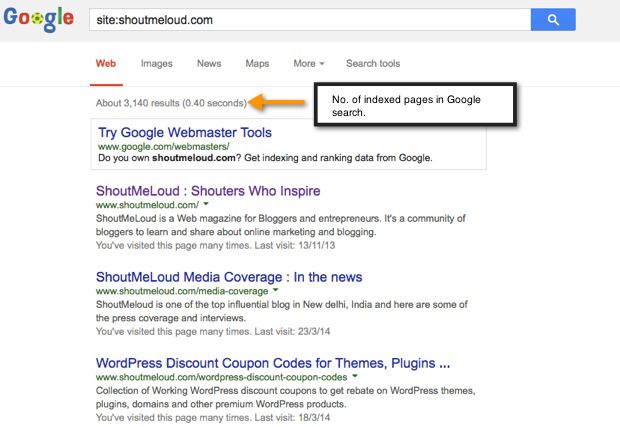
The easiest way to check this is to search site:yourdomain.com in Google. If Google knows your site exists and has already crawled it, you’ll see a list of results similar to the one for NeilPatel.com in the screenshot below:
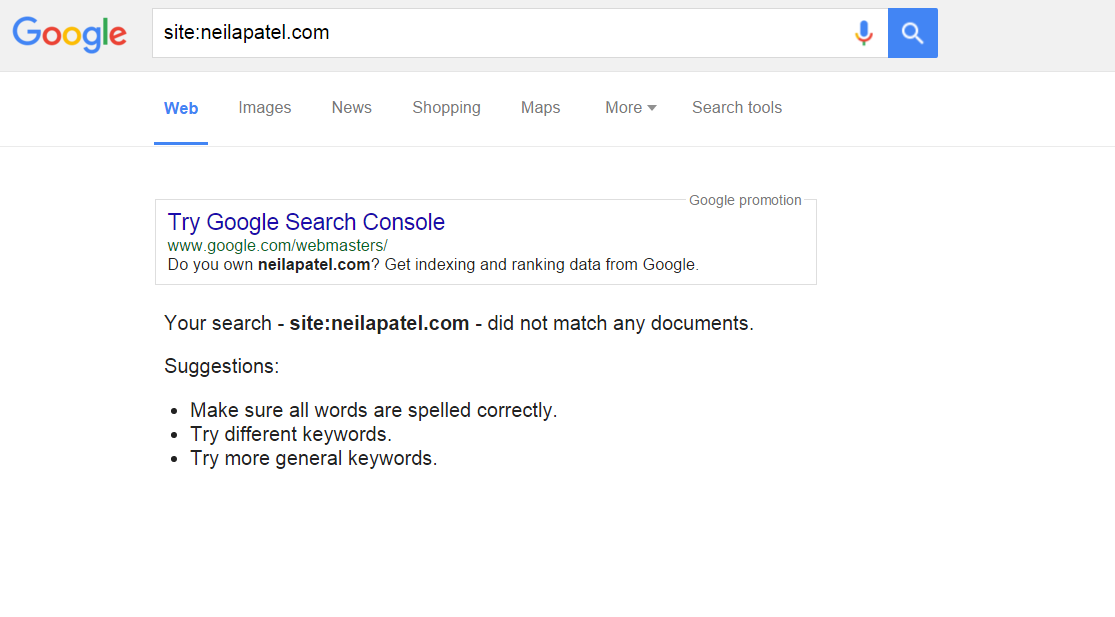
If Google hasn’t yet found your site, you’ll get no results at all, similar to this:
If your site is already indexed, that’s great, but there is likely room for improvement.
The rest of the steps in this guide will help you make sure that your site is indexed to its full potential.
Step 2: Install and Set Up Google Analytics & Search Console
If you’re not already familiar with these free Google tools, here’s a quick breakdown.
Google Analytics: Measures stats about your website like visitors, time spent on site, what pages they looked at, where they’re from, etc.
Google Search Console (formerly known as Google Webmaster Tools): It allows you to monitor different aspects of your website like when it was last crawled, any indexing errors, security issues, etc.
Search Console also lets you manage some key aspects of how you appear in search results and manually submit sitemaps — I’ll cover all of this later on in this article.
But first, let’s get set up.
If you already have Google Analytics and Search Console, click here to skip ahead to Step 3: Create a content marketing strategy.
To set up Google Analytics, click here and sign in with your Google account.
This would be either your @gmail.com email address or your @mydomain.com email address if you use Google’s G Suite for Business service.
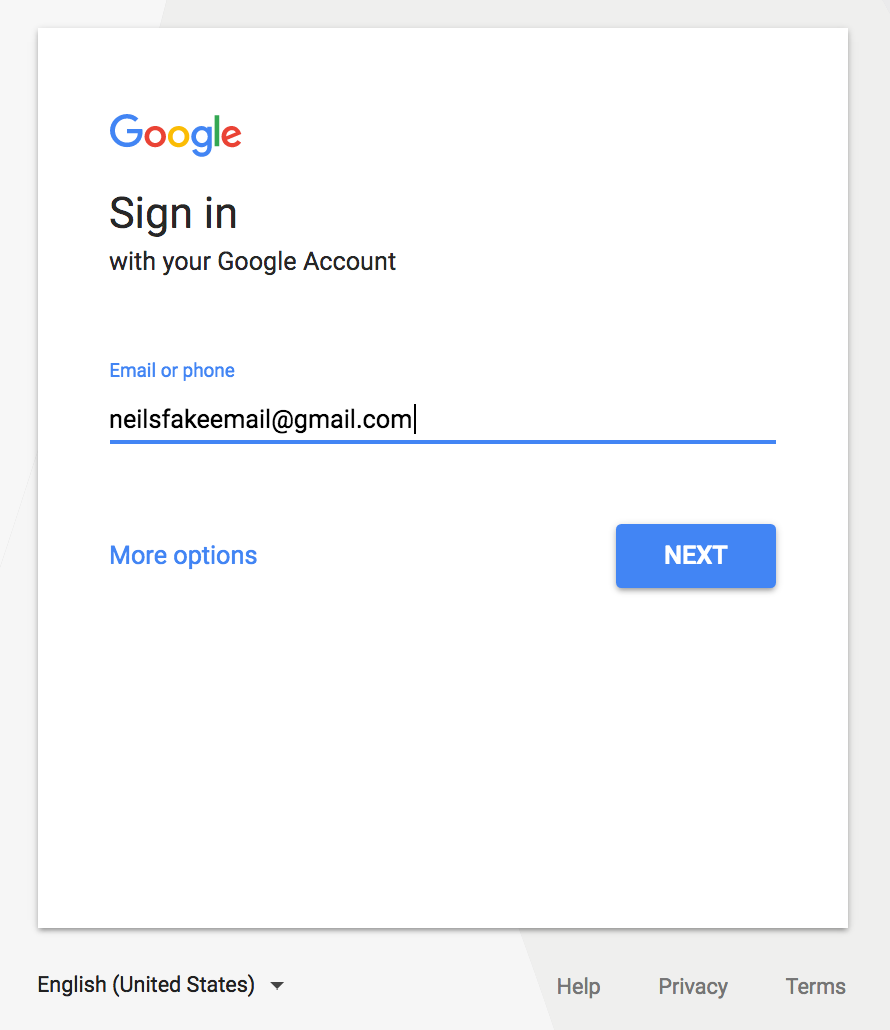
Then, click Sign Up.
Enter your website name and URL, then click Get Tracking ID at the bottom of the page.
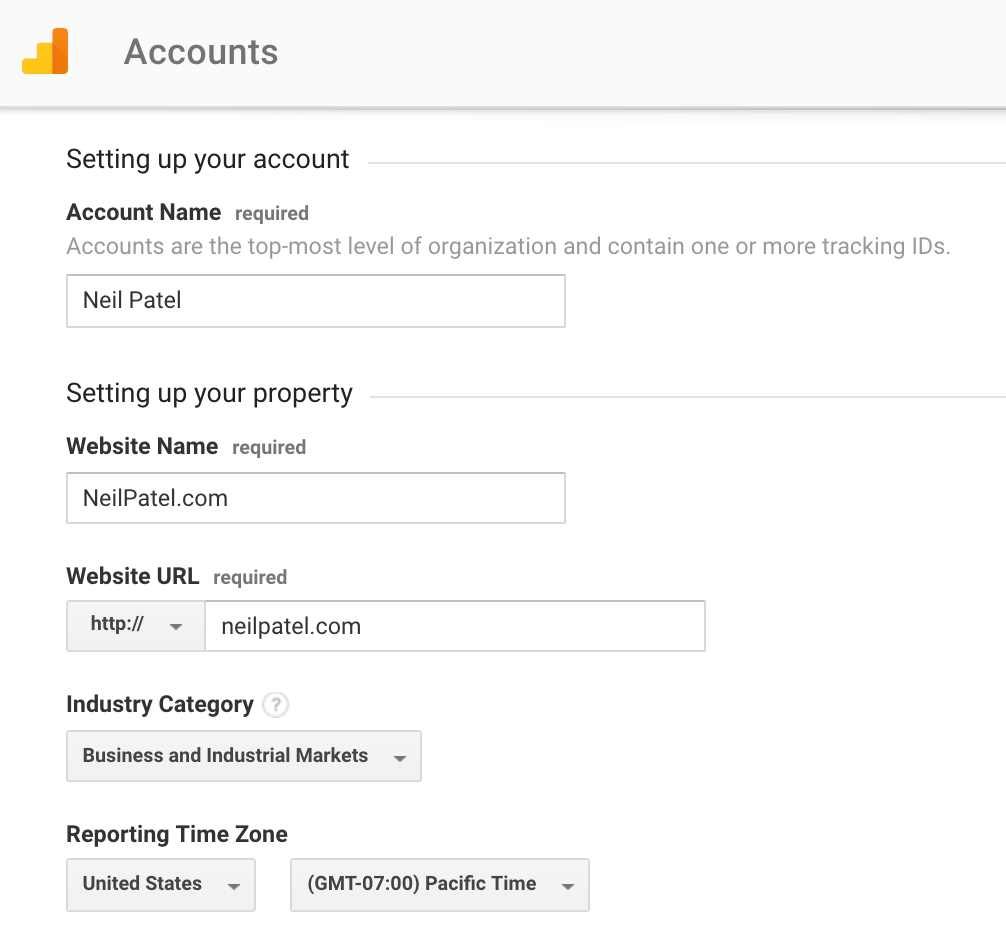
You’ll see a page like this. Don’t panic!

There are a few ways to install Google Analytics on your website.
Google Analytics Setup
If you’re using WordPress or another content management system that is asking you for your Google Analytics Tracking ID, then you just need the number at the very top. In my case, it’s UA-98962030-1.
That’s not my real tracking ID! Just saying, don’t post that online! 😉
The WordPress plugin Google Analytics by MonsterInsights is really easy to set up.
Just download it, upload the plugin to WordPress, activate it, and you’ll see this screen.
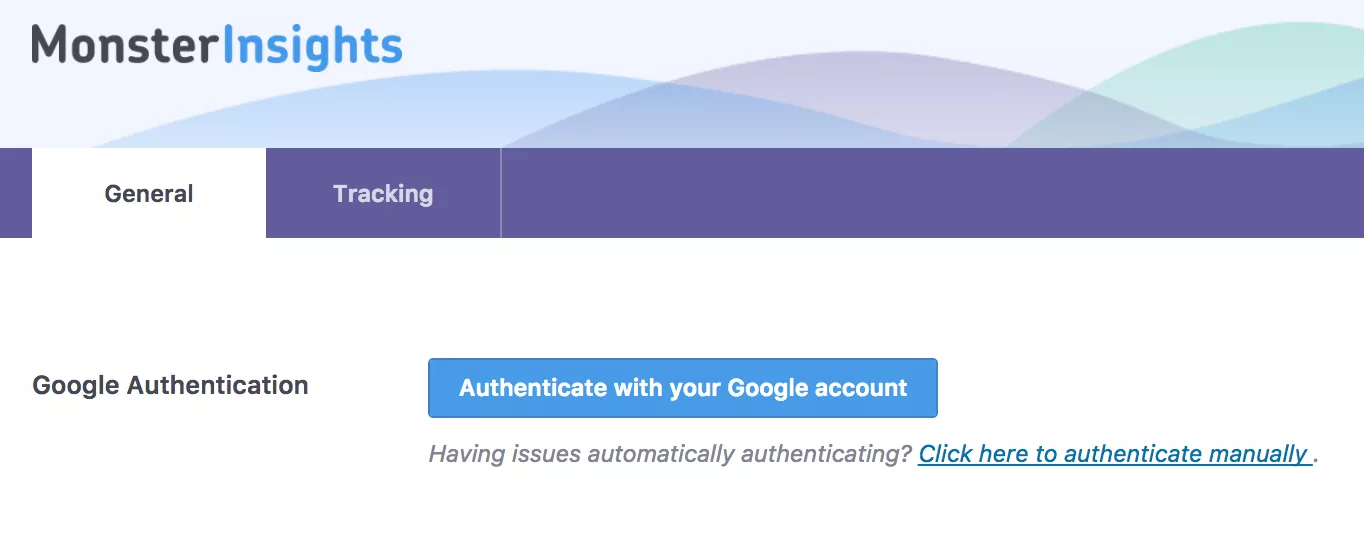
Press the blue “Authenticate” button and it walks you through the rest.
To set up the plugin, you need to have an Analytics profile already created, which we did in the previous step.
If you’re not using WordPress or want to add your Analytics code manually, here’s how to do that.
You need to put this code (in the red box) onto every single one of your website’s pages.
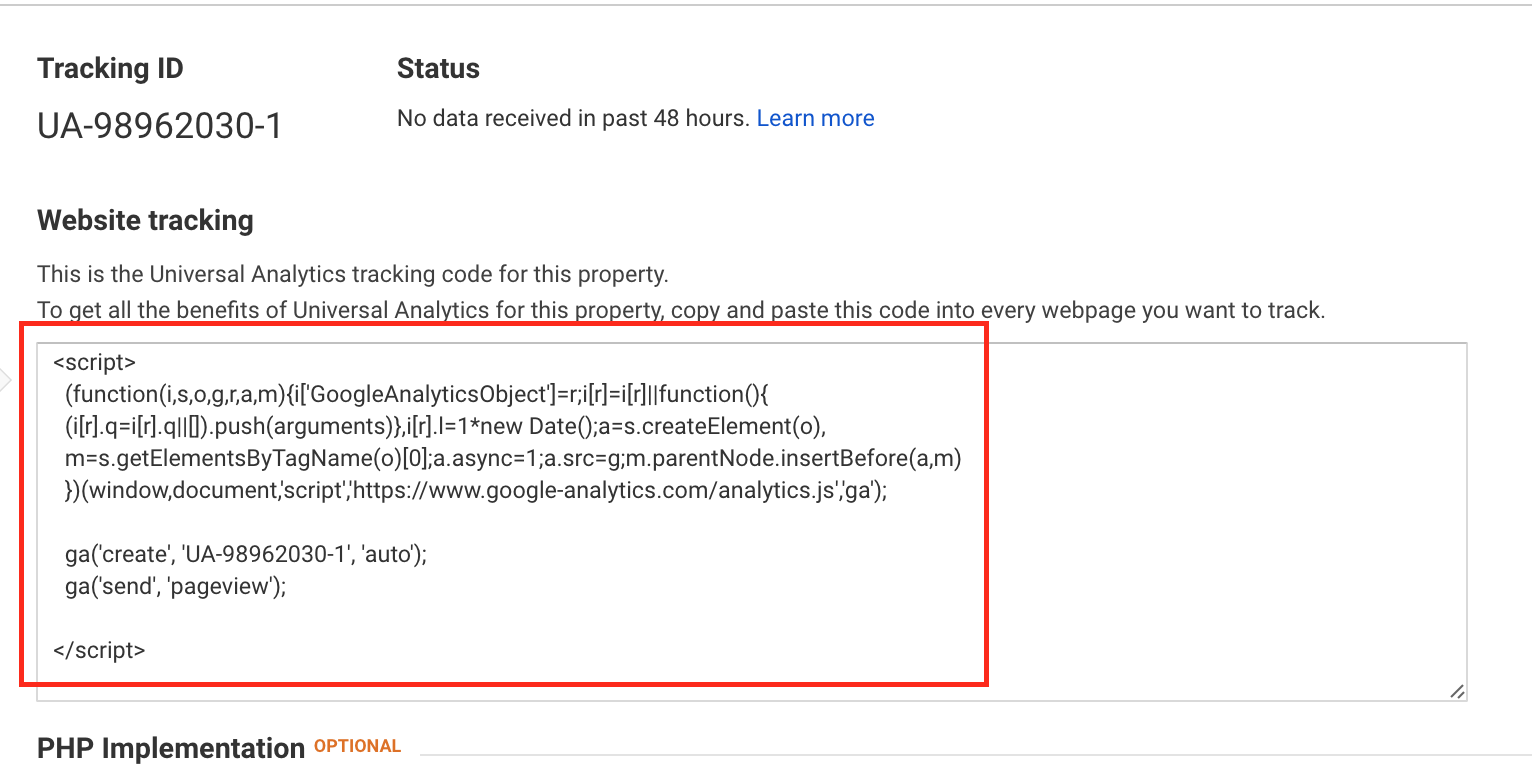
The easiest way to do this is to create one file with the code in it and then create a line of code on each of your website’s pages that pull in that file.
Piece of cake, right?
Don’t worry, here’s how to do that!
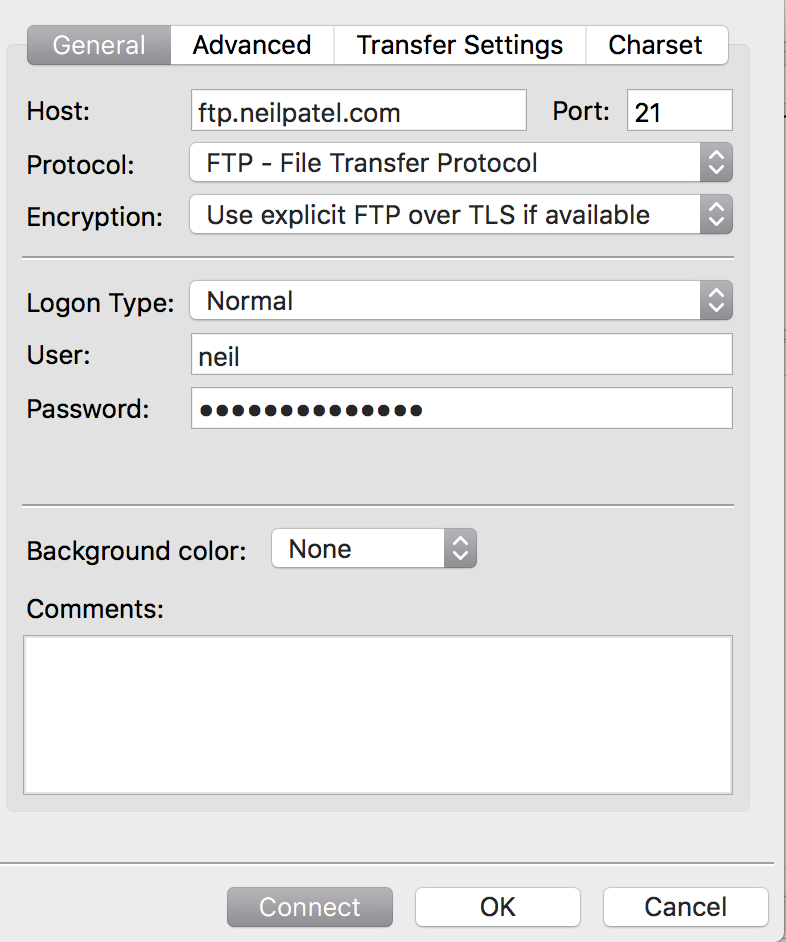
For this step, you need to be able to access your website files on your web hosting company’s server. This is commonly done via FTP.
Open up your FTP client (FileZilla is a great, free one) and login to your server. If you don’t have this information, you can create an FTP account in your web host’s cPanel, or just contact your web host to ask them for the information.
Your login information should look similar to this:
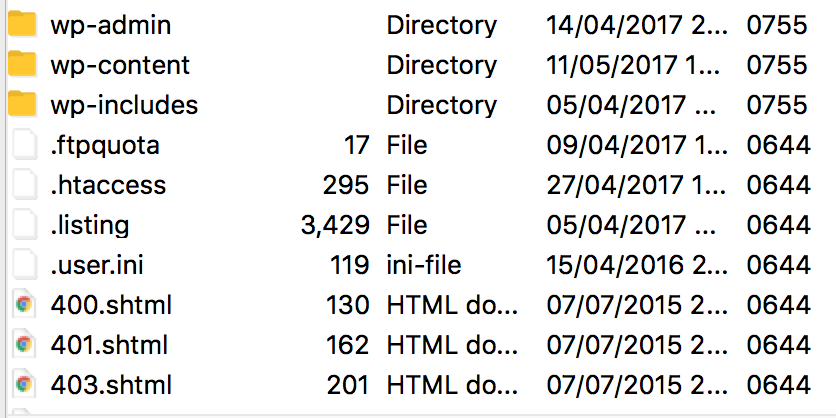
Once you’re connected, you’ll see a list of files and folders like this.
Open up a new text file (Notepad for Windows or TextEdit for Mac are fine for this). Make sure it’s set to Plain Text Only.
In TextEdit, you click on Format -> Make Plain Text to do that.
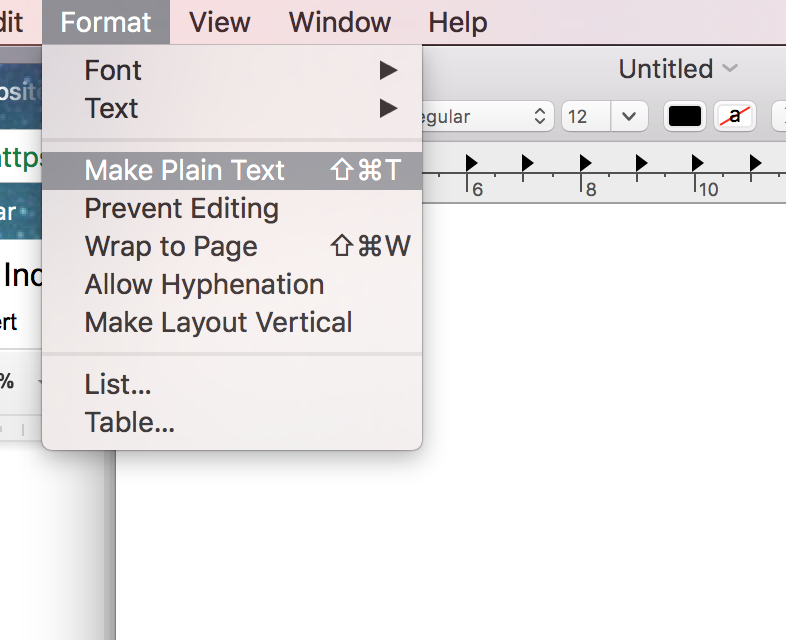
This is really important because word processors like Word can add formatting to the code that can mess up the coding on your site. When working with code, always use plain text.
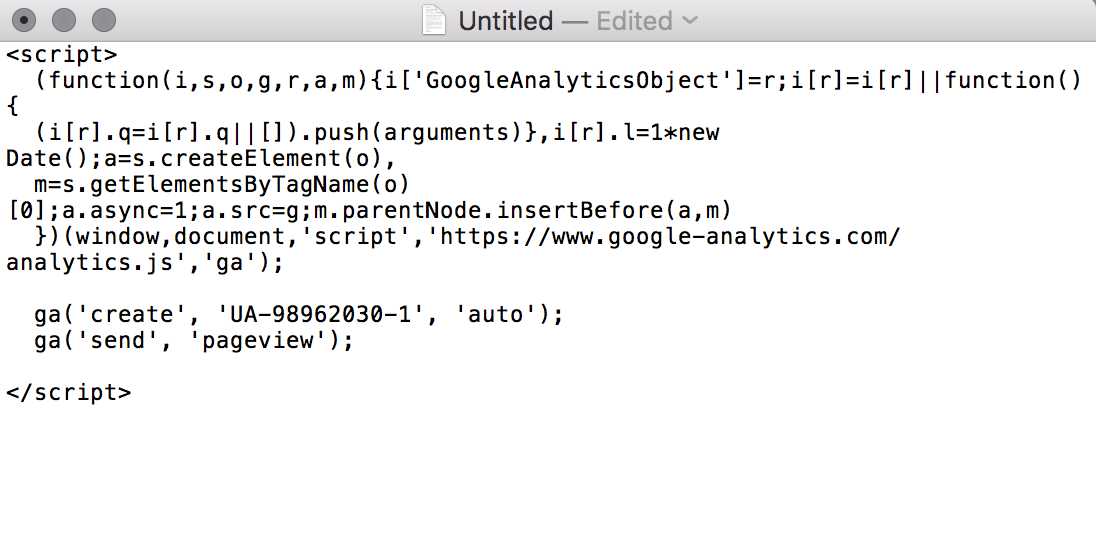
Once you have your plain text document, paste the Google Analytics code. You’ll end up with this:
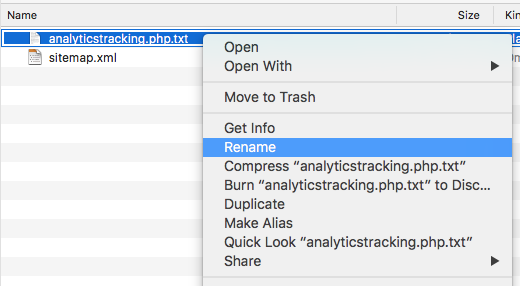
Save your file as analyticstracking.php. Make sure it has the .php extension on it and not .txt.
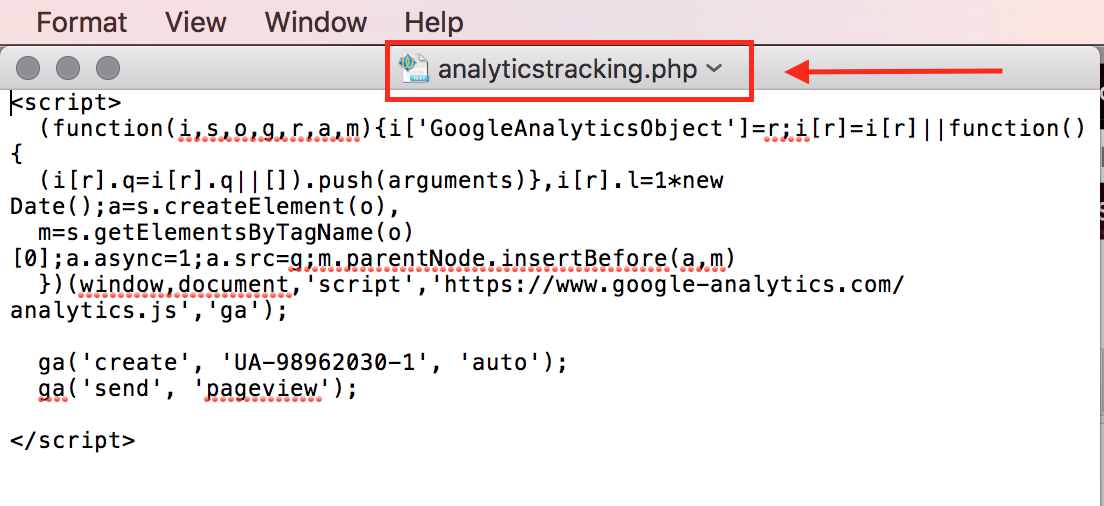
If your text editor saved it with the name “analyticstracking.php.txt” for some reason, just rename the file on your computer to “analyticstracking.php”.
Upload this file to your root directory via FTP (the first folder of your website).
You need to add one line of code for each page template you have. This “calls” the file we just made and ensures every page of your website that uses that template is tracked in Google Analytics.
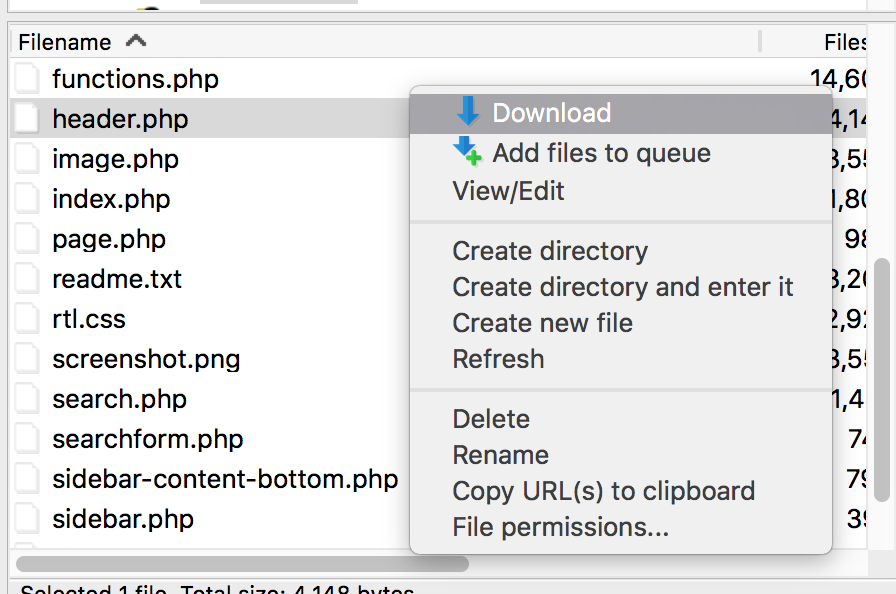
To do that, download all your website PHP template files and edit them.
If you have one named header.php that loads on every page, you only need to do this once!
Download header.php.
Next, open up the downloaded file in your text editor.
Look for the </head> tag and the beginning of <body>, like this:
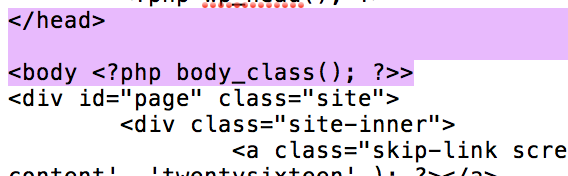
Insert one line of code right after the <body> tag.
Copy this code: <?php include_once(“analyticstracking.php”) ?>
And paste it here:

Save your header.php file, and reupload it to your website.
Done!
If you don’t have a header.php file, you need to repeat this process for each php page template you have on your website, like index.php, blog.php and so on.
If you use WordPress, you’re definitely at an advantage. All you need to do is install a plugin.
Okay, one more thing to set up and we’ll move on to Step 3.
Google Search Console Setup
Now that we have Analytics set up, it’s time to add our website to Google Search Console (formerly known as Google Webmaster Tools).
Click here to go to the Search Console. Log in with your Google account.
You’ll see this screen:
Click “Start now.”
You’ll then need to verify that you own that domain. There are a few ways to do this.
By default, it may show you a verification option through your web host.
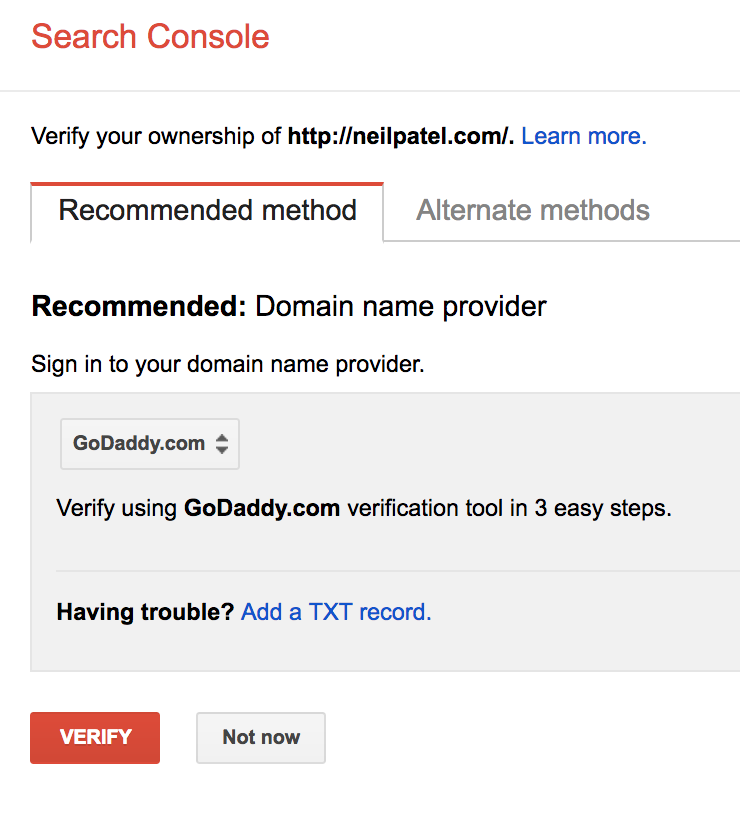
Click on the dropdown to find your domain name provider.
If yours isn’t on the list, you can press Other (at the bottom).
Search Console then asks you to create a TXT record, which involves an edit to your domain configuration.
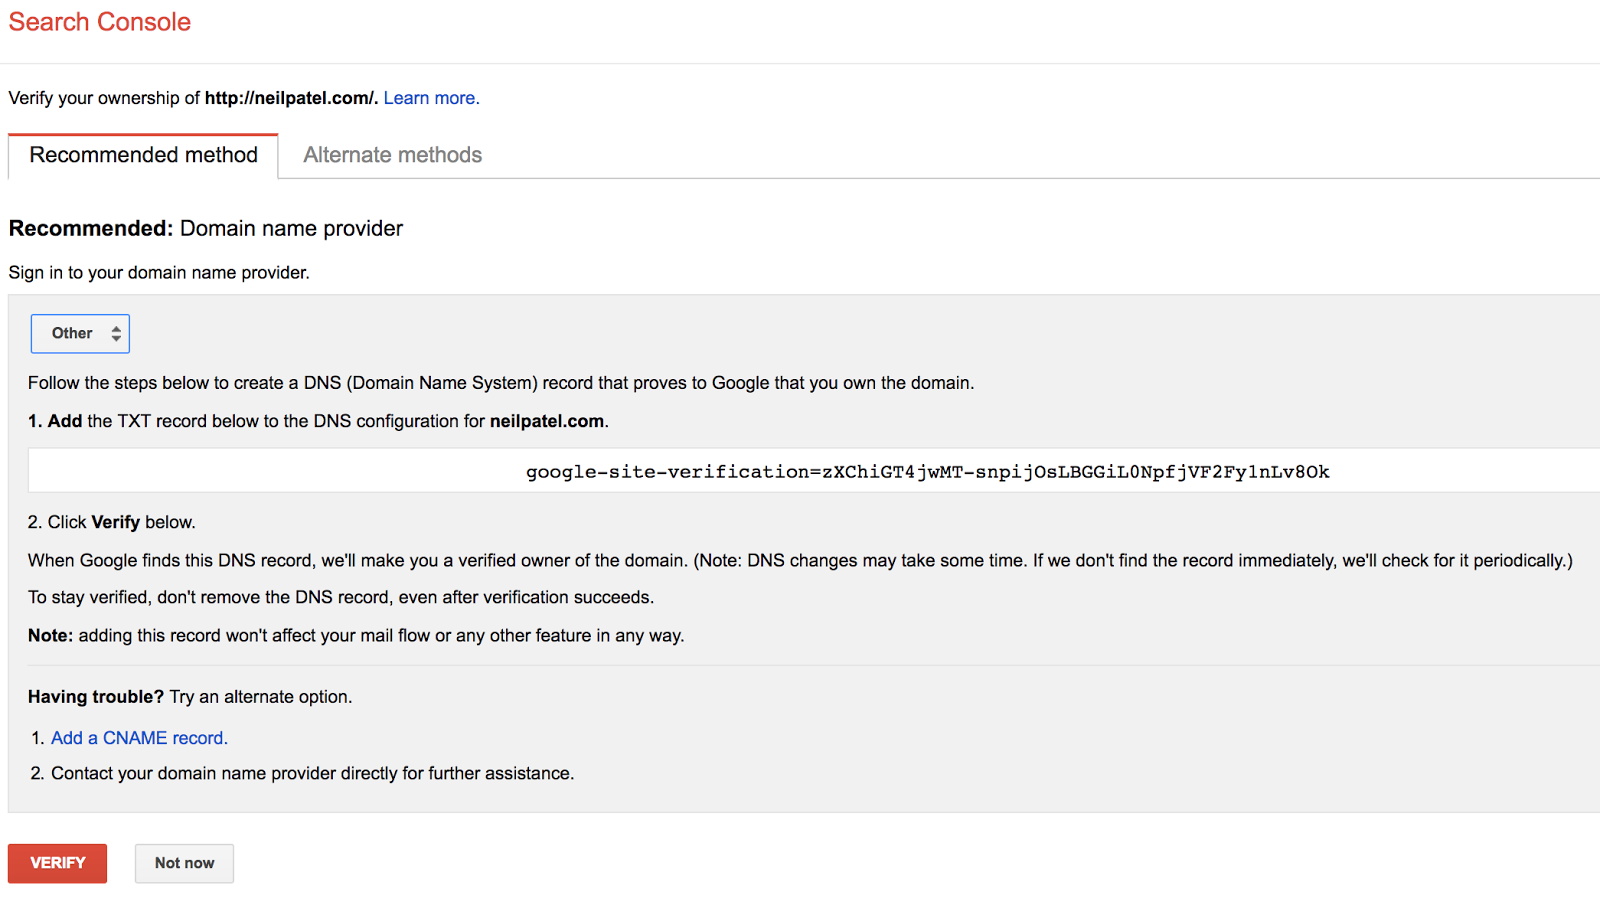
Is this a little over your head? Not to worry, I’ve got a much easier way!
If you still want to add a TXT record though, here’s how.
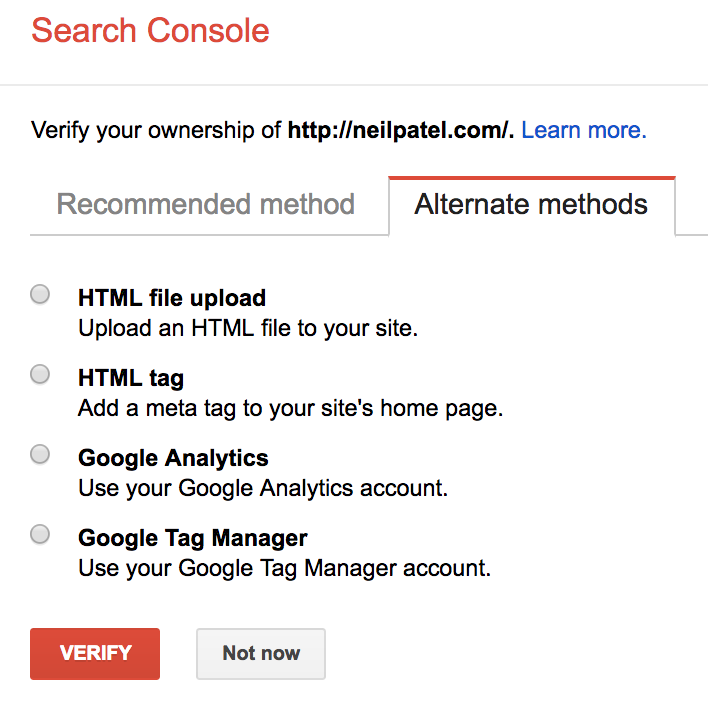
Click on Alternate Methods at the top.
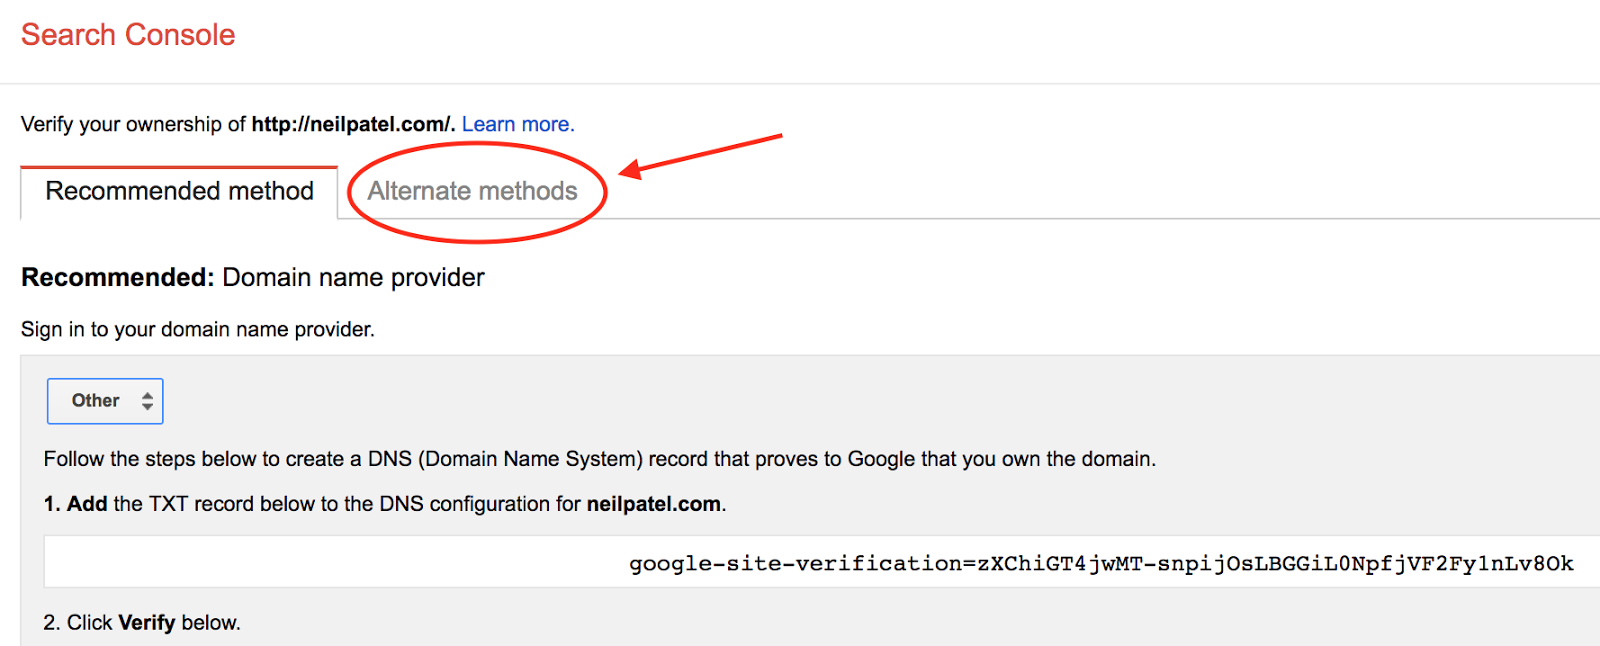
There are two easy ways to verify your domain: with Google Analytics or via an HTML file upload.
I’ll cover both of them.
To verify with Google Analytics, just select it and click Verify.
Google will check your Analytics account to make sure you are who you say you are, and if you are, you’ll see a success message. Make sure you’re using the same Google account with Search Console that you do with Analytics.
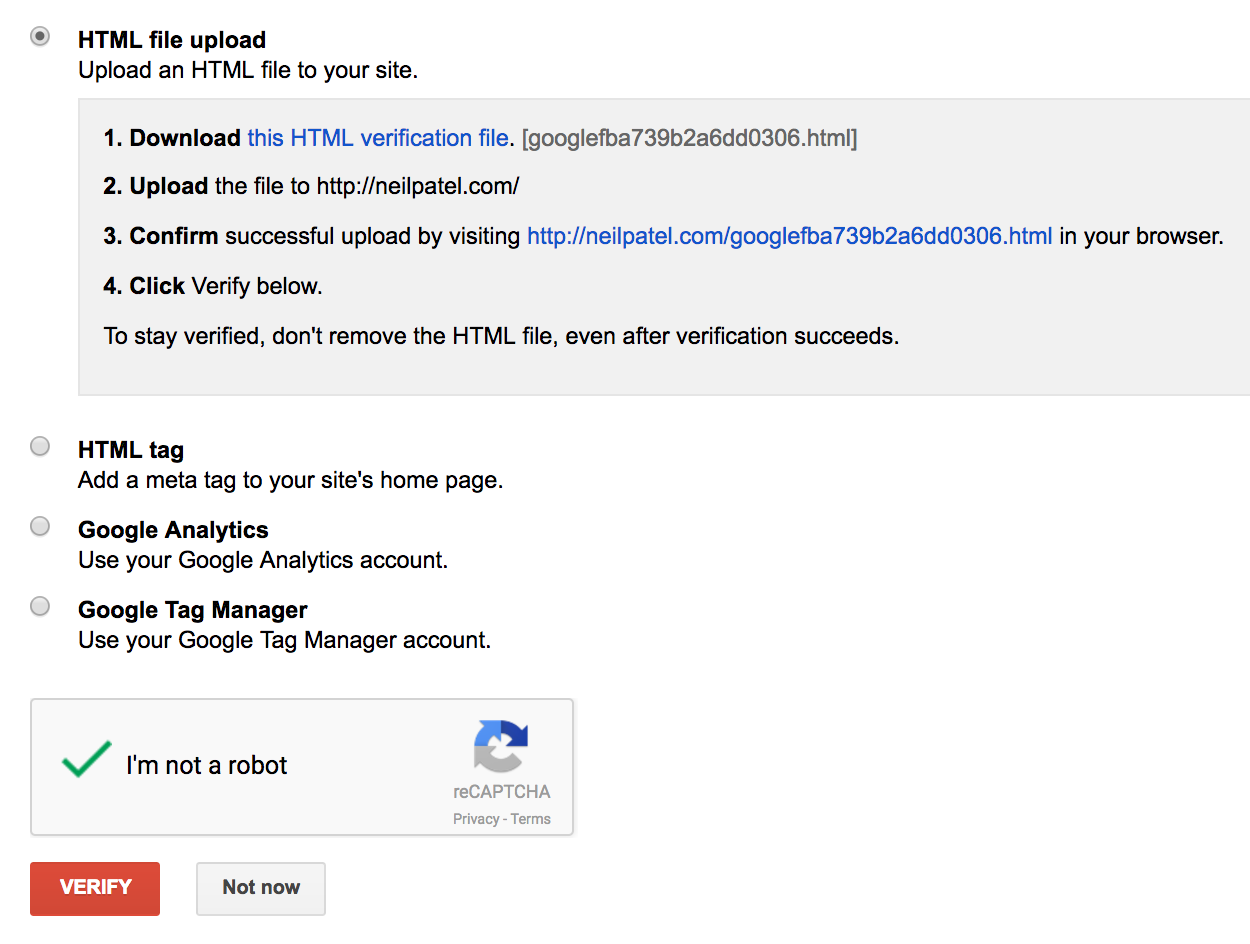
The process is still pretty easy with the HTML file upload method.

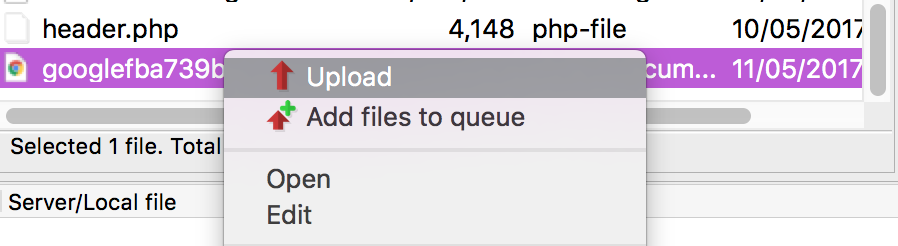
Click to download the file to your computer in step 1, then open up your FTP program again. Upload Google’s HTML file to your root directory.
Next, visit the URL Google gave you to make sure the file is there. In my case, that’s https://ift.tt/2sbDIUa.
If you uploaded it correctly, you’ll see the filename in your browser window.

Go back to Search Console and click Verify at the bottom.
That’s it!
Make sure to leave the HTML file on your server. It ensures that your website will stay verified with Search Console.
There are two more really important things you need to do now:
- Add both the neilpatel.com and www.neilpatel.com versions of your domain
- Set a preferred domain
Why do you have to do that, you ask?
It can cause crawl errors, which we are trying to avoid!
Adding the other version of your URL is easy – repeat the same process that I just explained. In the example above, I verified my neilpatel.com domain. So I would go into Search Console and do the exact same steps but use “neilpatel.com” instead.
Once you have both “yourdomain.com” and “www.yourdomain.com” added to Search Console, you need to set the preferred domain.
To do that, click on your website in Search Console.
At the top-right corner, click the gear icon and click Site Settings.
Select if you’d like your URLs displayed with the “www.” or without.
I’m going to show you all the awesome things you can do with Search Console later in this article, so keep that tab open!
But now, we need to get back to marketing fundamentals and talk about creating an SEO strategy for your content.
Step 3: Create a Content Marketing Strategy
It’s for your own benefit to have a written content marketing strategy that’s focused on search results.
But don’t take my word for it.
From the Content Marketing Institute:
“Those with a documented content marketing strategy:
- Are far more likely to consider themselves effective at content marketing
- Feel significantly less challenged with every aspect of content marketing
- Consider themselves more effective in their use of all content marketing tactics and social media channels
- Are able to justify spending a higher percentage of their marketing budget on content marketing”

All of those things are absolutely true. For me, I feel a lot more on track when I have a written plan of action that I can refer to and track my success.
My blogs and multiple businesses would not have grown as quickly as they did without having a written plan.
In addition to keeping you focused on your goals, a documented content strategy also helps you get your site’s pages indexed by creating new pages of content.
According to HubSpot’s “Not Another State of Marketing Report 2020” , 60 percent of content marketers said content is very important or extremely important to their overall strategy.
One study found that companies that use content marketing enjoy conversion rates that are six times higher.
Doing your best to publish valuable, interesting, and useful content and then doing everything you can to make sure that your potential customers see it.
Here’s an example.
When I create and publish a professional infographic on my site and it gets shared on another web page with a link back to my page, I get content marketing “credit” for both posts.
Since it’s an infographic, I’m more likely to engage my audience on both sites.
Infographics have one of the highest reader engagement rates. It’s been proven that most people spend longer looking at infographics than they do reading the text on the page.
But you’re totally reading this, right?!
Infographics get shared on social media about 3x more than any other type of content.
When you’re putting together your content marketing strategy, blogging definitely needs to be on the list.
But you also need to factor in content that you’ll publish on other websites. This not only helps grow your traffic but also helps with indexing speed and obtaining inbound links.
Here are some examples of offsite content to go into your plan:
- Guest posts on other sites in your niche
- Press releases submitted to sites that publish that kind of content
- Articles on high-quality article directory sites (Note: Be careful here — the vast majority of article directories are not high quality and can actually hurt your brand, reputation, and SEO.)
- Some reputable directories are Medium and HubPages.
- Videos hosted on Vimeo or your YouTube channel
Of course, any content you put your name or brand on must be high quality and published on a reputable, authoritative site.
Otherwise, you’re defeating the purpose of search engine optimization and hurting your traffic and brand in the process.
Content that’s published on “spammy” sites with a link back to your site suggests to Google search results that your site is also spammy.
Examples of reputable sites to guest post on might be Forbes, Entrepreneur, Smashing Magazine, etc. These are well-known websites with a reputation for quality content, which is exactly what you want to be associated with your brand.
Not so good places to post? Sites full of low-quality red flags: cluttered with ads, lots of grammatical or spelling mistakes, or unknown in the industry you’re trying to target.
I don’t want to name any names here, but your common sense should be enough to tell you what a spammy site is. For example, a site named “neilsbestmarketingadvice101.tumblr.com” is probably not going to do much for you, right?
A well-thought-out content marketing plan helps you avoid getting tripped up in the mad rush to publish more content. It puts you in the driver’s seat of search engine optimization so you can focus on generating leads and increasing your conversion rate.
Creating a written content strategy doesn’t have to be difficult.
Here’s the framework I use for mine:
- What are your goals? Specify SMART goals and how you’ll measure your progress (i.e., metrics).
- Who is your target audience? Customer profiles or personas are essential to understanding your audience and what they want/need.
- What types of content will you produce? You want to make sure you’re delivering the type of content that your target audience wants to see.
- Where will it be published? Of course, you’ll be hosting your own content on your website, but you may also want to reach out to other sites or utilize platforms such as YouTube, LinkedIn, and Slideshare.
- How often will you publish your content? It’s far better to produce one well-written, high-quality article a week consistently than to publish every day for a week and then publish nothing for a month. Consistency is key.
- What systems will you adopt for publishing your content? Systems are basically just repeatable routines and steps to get a complex task completed. They’ll help you save time and write your content more quickly, so you can stay on schedule. Anything that helps you publish content in less time without sacrificing quality will improve your bottom line.
- What tools will you use? Include the blogging/content tools and technology you’ll use and how they fit into your system.
Once you have your content marketing plan documented, you’ll find it easier to publish great content on a consistent schedule. This will help your site’s new web pages get indexed faster.
Step 4: Start Blogging
Why do you need a blog?
It’s simple: Blogs are hard-working SEO machines. Blog content gets crawled and indexed more quickly than static pages.
Blogs also bring in more traffic. Businesses that blog regularly generate 55% more visitors to their sites than those that don’t.
Blogging works for every kind of business, industry, or niche, as well as for almost all business models — even B2C and e-commerce sites.
Don’t be afraid of committing to a blog.
Yes, it does require consistent effort. You do have to write (or outsource) high-quality, in-depth blog posts on a regular basis.
The rewards, I’ve found, are absolutely worth it.
If you have an ecommerce site, blogging doesn’t have to be terribly complex or difficult.
For example, when you create a new product page, write and publish a blog post about the new product. Add quality images of the product and link to the product page. This helps the product page get indexed more quickly by search engines.
Another great blogging strategy for ecommerce is to write a post every time a customer asks you a question.
For more of a sales-oriented strategy, share that blog post link with other bloggers and influencers to get the word out. Maybe they’ll want to feature your product on their blogs, which again is a great source of links and traffic and will positively impact your crawl rate.
Step 5: Use Internal Links on Your Website
Internal links, i.e. linking to pages on your own website, is another great way to get indexed quickly and increase your position in organic search results.
One very obvious source of internal links is your website’s navigation.
It’s important to structure your website navigation in such a way that it makes sense to Google.
Your navigation should follow a predictable flow like Homepage -> Category -> Sub Page.
All elements should be obviously related. So if you are a web designer, your navigation might look like this.
Homepage -> Web Design Services -> WordPress Design
See how those are all related and make sense?
Another key factor is to structure your URLs properly. Google’s rule of thumb is for them to be as simple and straightforward as possible.
So if it makes sense to you, a human, it should make sense to Google too.
Another great way to link to your content is in blog posts.
People typically link phrases in their blogs over to relevant topics, like if I wanted to offer you more information on URL structuring.
Or, I could create a line like this:
Related: Does URL Structure Even Matter? A Data Driven Answer
This builds links, which causes Google’s spiders to come back and crawl those pages again. Also, it positively adds to the user experience. Your readers will appreciate the further resources.
Remember to keep user experience in mind at all times. It goes hand in hand with SEO. Google has all these rules and ways it works because it’s trying to deliver the best results to its users and give them the answers they’re looking for.
You should be focused on the same thing!
Step 6: Promote Social Sharing of Your Content
Naturally, getting people to share your content on social media is a good thing. Pretty sure I don’t need to convince you about that!
It exposes your content to new people, attracts them to your website, and it’s the kind of content people want to see the most.
But sharing your posts on social media also has SEO benefits, because it creates links back to your content.
Which, if you’ve been paying attention… tells Google’s spiders to go index your site
Bonus points if you already guessed that.
There is some debate out there about just how much social media links factor into organic search rankings.
Google has mixed statements on the subject, saying at first in 2015 they did not factor in social media posts to organic search ranking at all and then later saying they did.
“Yes, we do use it as a signal. It is used as a signal in our organic and news rankings. We also use it to enhance our news universal by marking how many people shared an article.”
Matt Cutts of former Google fame said a few years back:
I filmed a video back in May 2010 where I said that we didn’t use “social” as a signal, and at the time, we did not use that as a signal, but now, we’re taping this in December 2010, and we are using that as a signal.
Bing, on the other hand, has been very clear about how it uses social media links in search result rankings, known as “social signals.”
Many marketers believe social signals are a considerable ranking factor, and I’m one of them.
Social sharing has helped me grow my blog significantly. When I started NeilPatel.com, I started from nothing and quickly grew my audience to 60,000 monthly readers within 2 months.
Now I average over 20 million monthly visits.
I attribute a lot of my success to social sharing and the positive SEO growth I got from social signals, links, and increased speed of page indexing.
When it comes down to it, social sharing has many other benefits for your website anyway, so just do it!
Step 7: Add a Sitemap Plugin to get Google to Index Your Site
First, let’s talk about what a sitemap is.
You’ve undoubtedly seen the word “sitemap” before – but maybe you never knew exactly what it meant and how it relates to search engine optimization.
A sitemap is a file that tells Google about the files on your website, including how they relate to each other. This makes it easier for Google to crawl and index your site.
The sitemap is basically a list (in XML format) of all the pages on your site. Its primary function is to let search engines know when something’s changed – either a new web page or changes on a specific page – as well as how often the search engine should check for changes.
Do sitemaps affect your search rankings? They can, but only slightly.
They do help your site get indexed more quickly with a more efficient crawl rate.
In today’s world of search, there are a lot of SEO myths you need to be wary of. But one thing remains the same: all things being equal, great content will rise to the top, just like cream.
Sitemaps help your content get crawled and indexed so it can rise to the top of SERPs more quickly, according to the Google Webmaster Blog.
In Google’s own words, “Submitting a Sitemap helps you make sure Google knows about the URLs on your site.”
Is it a guarantee your site will be indexed immediately? No. But it is definitely an effective webmaster tool that helps in that process.
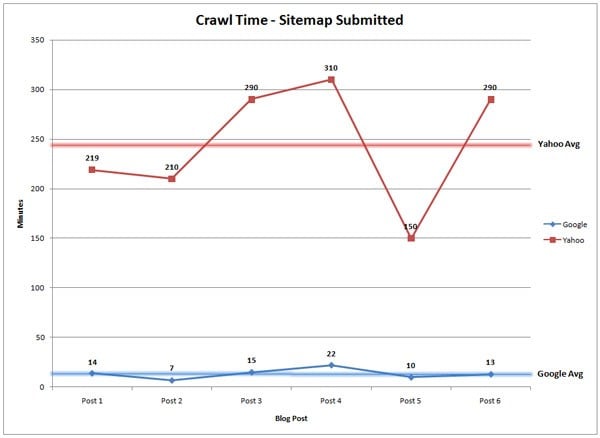
Casey Henry wondered just how much sitemaps would impact crawl rate and indexing, so he decided to conduct a little experiment.
Casey talked to one of his clients who ran a fairly popular blog using both WordPress and the Google XML Sitemaps Generator WordPress plugin (more on that below).
With the client’s permission, Casey installed a tracking script, which would track the actions of Googlebot on the site. It also tracked when the bot accessed the sitemap, when the sitemap was submitted, and each page that was crawled. This data was stored in a database along with a timestamp, IP address, and the user agent.
The client just continued his regular posting schedule (about two or three posts each week).
Casey called the results of his experiment nothing short of “amazing” as far as search engine optimization is concerned.
But judge for yourself: When no sitemap was submitted, it took Google an average of 1,375 minutes to find, crawl, and index the new content.
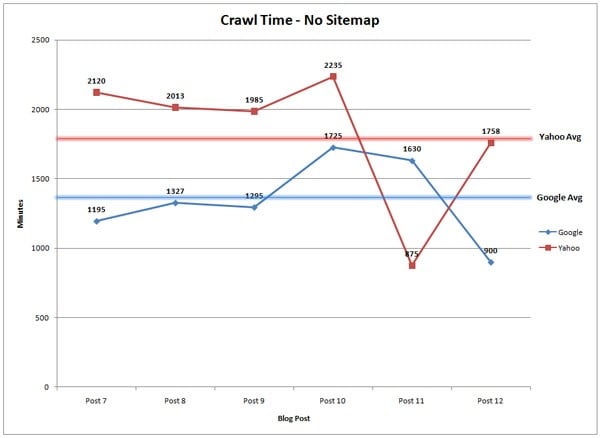
When a sitemap was submitted? That average plummeted to 14 minutes.
How often should you tell Google to check for changes by submitting a new sitemap? There’s no set-in-stone rule.
However, certain kinds of content call for more frequent crawling and indexing.
For example, if you’re adding new products to an ecommerce site and each has its own product page, you’ll want Google to check in frequently, increasing the crawl rate. The same is true for sites that regularly publish hot or breaking news items that are constantly competing in search engine optimization queries.
But there’s a much easier way to go about the sitemap creation and submission process. If you’re using WordPress, simply install and use the Google XML Sitemaps plugin.
Its settings allow you to instruct the plugin on how frequently a sitemap should be created, updated, and submitted to search engines. It can also automate the process for you, so that whenever you publish a new page, the sitemap gets updated and submitted.
Other sitemap tools you can use include the XML Sitemaps Generator, an online tool that should work for any type of website.
Once you have your sitemap, you want to submit it to Google Search Console, which we’ll cover next.
Step 8: Submit a Sitemap to Search Console
It’s crucial to ensure your sitemap is up to date with Google Search Console. I like to go in once every 2 weeks, or at the very least monthly, and update it.
Not signed up for Google Search Console yet? Head back to Step 2 to see how.
Click the URL to go to the Dashboard for that site. On the left, under “Index” click “Sitemaps.” You’ll see the sitemaps already submitted to Google as well as add a new sitemap.

For the next step, you need the URL of your sitemap. If you’re using a plugin for WordPress, that information will be available in the plugin’s settings.
Typically, the URL is yourdomain.com/sitemap.xml.
As I mentioned above, you can also use a website like XML-Sitemaps.com to create one. To do that, just enter your URL and choose a change frequency time.
The change frequency just tells Google how often it should index your site. It’s merely a suggestion to Google, and it’s up to the spider to determine when it will come back to index your site again.
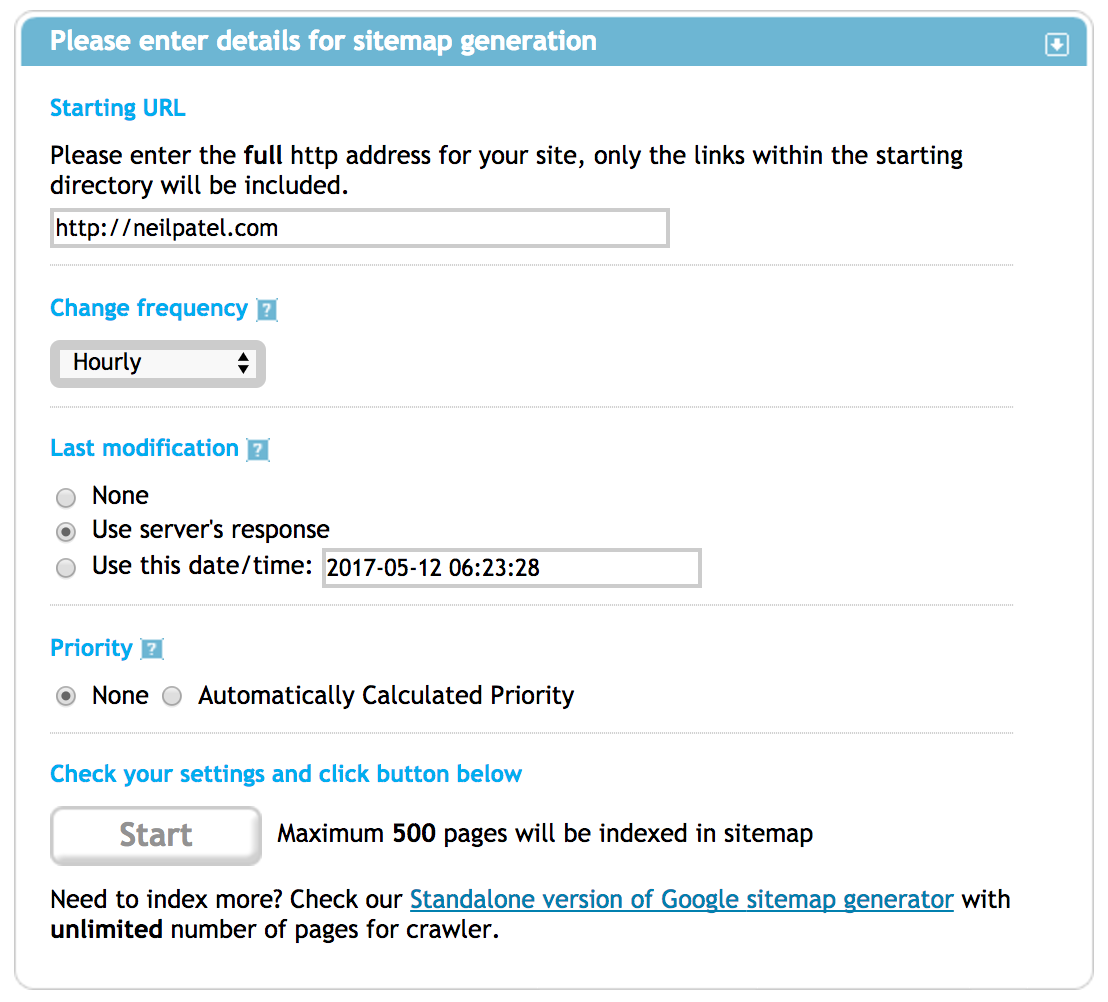
Once it gives you the sitemap.xml file, upload that to your website via FTP.
Once you have your sitemap URL, enter it into Google Search Console.
Once you submit it, you’ll see this at the bottom of the page.

Once Google is finished indexing it, the Processed column will change from Pending to the date it was indexed.
As you can see, only 294 out of my 473 web pages were indexed! Hopefully, the spider picks up more of them on this crawl. However, don’t be alarmed if you see similar stats — some of those pages are probably ones you don’t want to be indexed anyway (see Step 17 for details!).
Make a habit of submitting a new sitemap at least every month.
You can also use Bing’s Webmaster Tools to do the same for Bing. It’s good to cover all of your bases, especially since Bing is the second most popular search engine after Google!
Step 9: Create Social Media Channels
Do you have social media profiles set up for your site or blog? If not, now’s the time.
Why? Because as we learned in Step 6, one component of search engine optimization is paying attention to social signals.
Those signals can prompt the search engines to crawl and index your new site.
What’s more, social signals will help you rank your pages higher in the search results.
It’s obvious by now that a solid social media marketing plan helps SEO. But social profiles for your website also give you another place to add links to your site or blog.
Twitter profiles, Facebook pages, LinkedIn profiles or company pages, Pinterest profiles, YouTube channels, and especially Google+ profiles or pages — all of these are easy to create and the ideal places to add links pointing to your website.
If you don’t want to create new profiles on social sites for your new site or blog, you can alternatively just add the new site’s link to your existing profiles to increase the crawl rate.
I do, however, highly recommend creating new profiles for projects. Aside from being good for SEO, it will be great for branding.
This probably goes without saying, but if you’re making those social media channels, be prepared to update them regularly with new content, too.
Step 10: Use robots.txt
If you’re not an expert coder or developer, you might have seen a file called “robots.txt” in your domain’s files and wondered what it is and what it does.
The “what it is” part is very simple. It’s a basic, plain text file that should reside in the root directory of your domain. If you’re using WordPress, it’ll be in the root directory of your WordPress installation.
The “what it does” part is a little more complex. Basically, robots.txt is a file that gives strict instructions to search engine bots about which pages they can crawl and index — and which pages to stay away from.
When search spiders find this file on a new domain, they read the instructions in it before doing anything else.
If they don’t find a robots.txt file, the search bots assume that you want every page crawled and indexed.
Now you might wonder “Why on earth would I want search engines not to index a page on my site?” That’s a good question!
In short, it’s because not every page that exists on your site should be counted as a separate page for search result purposes. (More on this topic later!)
Your first step is to confirm that your new site has a robots.txt file. You can do this either by FTP or by clicking on your File Manager via CPanel (or the equivalent, if your hosting company doesn’t use CPanel).
If it’s not there, you can create one quite easily using a plain text editor like Notepad.
Note: It’s very important to use only a plain text editor, and not something like Word or WordPad, which can insert invisible codes into your document that will really mess things up.
WordPress bloggers can optimize their robots.txt files by using a reliable WordPress plugin like Yoast’s SEO plugin.
The format of a robots.txt file is pretty simple. The first line usually names a user agent, which is just the name of the search bot – e.g., Googlebot or Bingbot. You can also use an asterisk (*) as a wildcard identifier for all bots. This type of WordPress plugin is an effective webmaster tool.
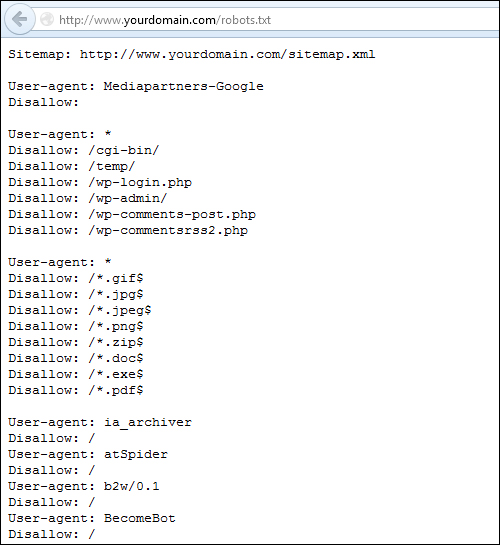
Next is a string of Allow or Disallow commands. These tell search engines which parts they should crawl and index (“Allow”) and which parts they should ignore (“Disallow”).
These rules ensure that only the pages you want to get indexed end up in search results.
So to recap: the function of robots.txt is to tell search engines what to do with the content/pages on your site. But does it help get your site indexed?
Harsh Agrawal of ShoutDreams Media says:
Yes.
He was able to get sites indexed within 24 hours using a combination of strategies, including robots.txt and on-page SEO techniques.
All that being said, it’s crucial to be very cautious when revising your robots.txt file, because it’s easy to make a mistake if you don’t know what you’re doing.
An incorrectly configured file can hide your entire site from search engines. This is the exact opposite of what you want! You must understand how to edit your robots.txt file properly to prevent hurting your crawl rate.
You may want to hire an experienced developer to take care of the job and leave this one alone if you’re not comfortable with the risk of hurting your SEO.
If you do want to try it out yourself, you can use the Google robots.txt tool to make sure your file is correctly coded.
Step 11: Index Your Site With Other Search Engines
You can also take the direct approach and submit your site URL to search engines.
Before you do this, you should know that there’s a lot of disagreement about manual site URL submission as a method of getting a site indexed.
Some bloggers suggest that it’s at least unnecessary, if not outright harmful.
In most cases, if your site has been up longer than a week, search engines have found it already. Submitting manually is pointless and paying companies to do it for you is robbery.
Manual search engine submission may also be harmful when you’re submitting your site to free submission sites that offer to list your site on multiple search engines. Those links can be low-quality and negatively impact your SEO.
See all these random directories and websites it’s going to submit your site to?
If those sites are seen as spammy by Google, having links to your site from them will hurt your SEO rankings. Google will penalize you for being “attached” to those sites.
Since there are other methods that work efficiently, most bloggers and site owners ignore this step.
On the other hand, it doesn’t take long and it can’t hurt your SEO as long as you’re just submitting to Google, Bing, Yahoo, or other very reputable websites.
To submit your site URL to Google, simply ask Google to recrawl your URLs via a sitemap update or use the URL inspection tool.
Note: Google used to let you directly submit URLs for indexing, but no longer does.
Step 12: Share Your Content on Aggregators
Content aggregators are websites that act as a search engine for user-submitted content.
What that means is people submit their content to these sites, then visitors can search and find content from people all over the world. They are huge networks of searchable content.
Well-known examples are Reddit and Medium.
Submitting your content on aggregators is a great source of links and new exposure, just like social media.
Some other aggregators you can share your content on are:
Medium is also a great place to share your content. For more detailed information, check out my full guide for growing your website traffic with Medium.
Step 13: Share Your Website Link Everywhere
Another simple way to get links to your new site or blog is through your own social status updates.
Of course, these links will be nofollow, but they’ll still count for indexing alert purposes, since we know that Google and Bing, at least, are tracking social signals from web pages.
The old saying “your network is your net worth” also applies here. If you’re just starting out, your first customers could come from family, friends or people they know, so don’t be shy about sharing your new website on your own personal social media accounts.
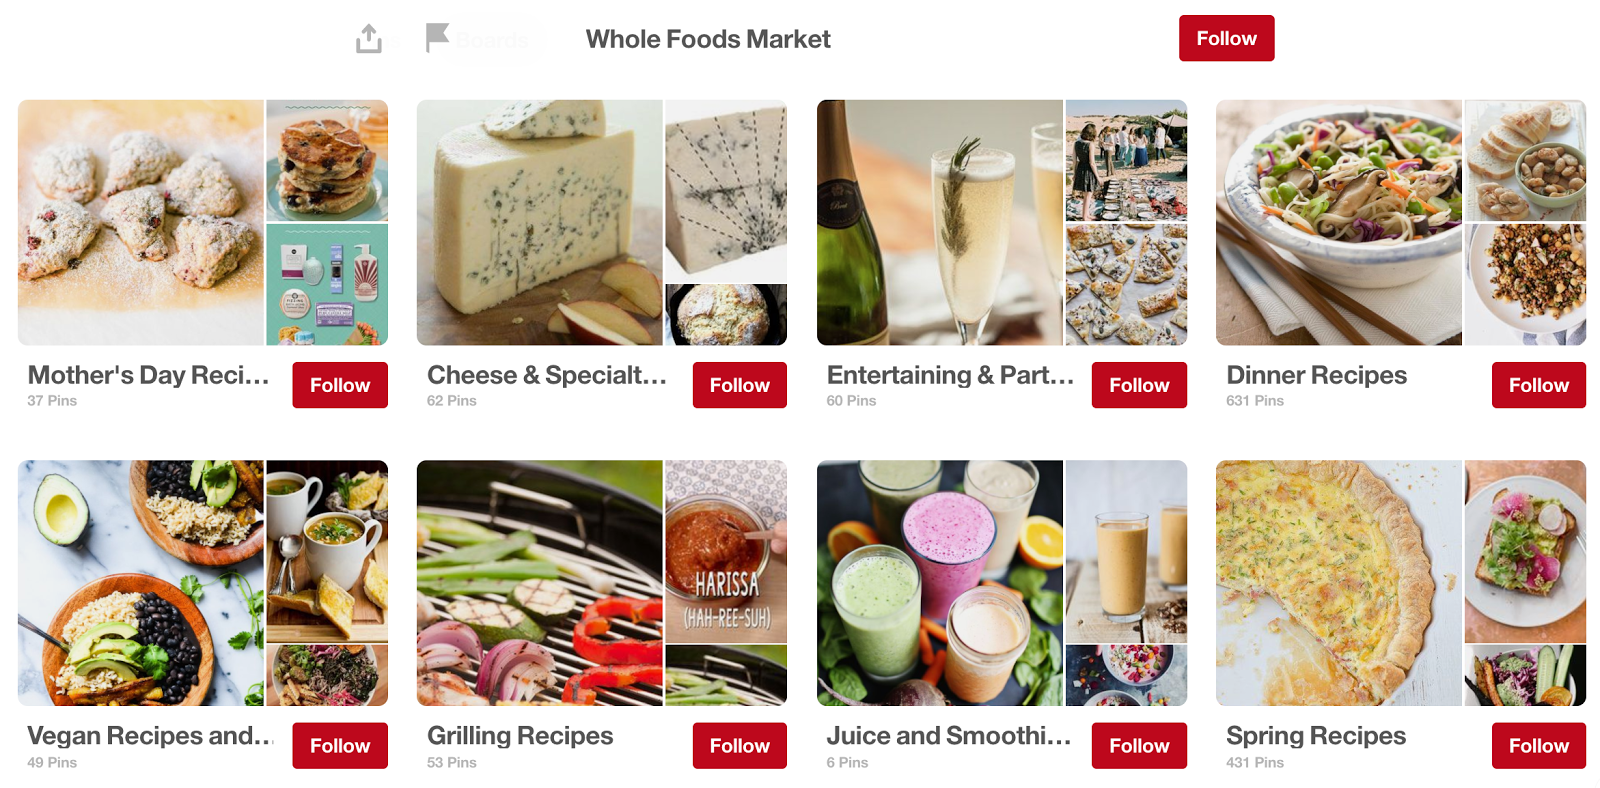
If you’re on Pinterest, select a high-quality image or screenshot from your new site.
Add the URL and an optimized description (i.e., make sure you use appropriate keywords for your site) and pin it to either an existing board or a new one you create for your site.
I love the way Whole Foods uses Pinterest to engage with its target audience (e.g. foodies and natural recipe seekers). They have boards for every topic, including current holidays and seasonal trends.
If you’re on YouTube, get creative! Record a short screencast video introducing your site and highlighting its features and benefits. Then add the URL in the video description.
Social Media Examiner suggests putting your URL in the first line of the description.
I also recommend using the right keywords in your title and descriptions.
If you have an existing email list from another business that’s related to the same niche as your new site, you can send out an email blast to the entire list introducing your new site and including a link.
Jon Morrow of Copyblogger fame did this with his new website, Unstoppable.me. He’s built an email list of thousands of people from his multiple businesses and successfully leveraged that to drive traffic to his new venture.
When he published his first post, he sent out an email to his subscribers from his other websites to let them know about his new site.
He also used his bio section on his site SmartBlogger to drive traffic to his new blog.

His first post on Unstoppable.me earned over 60,000 Facebook shares and 3,000 Twitter shares in just the first month.
Finally, don’t forget about your personal email account. Add your new URL and site name to your email signature. It’s simple, but it works.
Step 14: Set Up an RSS Feed
What is RSS?
RSS is an automated feed of your website content that’s updated when you publish a new blog post. It stands for Really Simple Syndication or Rich Site Summary, and it’s good for both users and site owners.
How does it impact indexing and crawling?
Well, before we get to that, let’s clear one thing up now: Many think RSS is dead.
The number of users has been steadily dropping since Google killed Google Reader back in 2013. I think RSS is evolving, rather than dying.
RSS generally helps increase readership and conversion rate, but it can also help get your pages indexed.
To users, RSS feeds deliver a much easier way to consume a large amount of content in a shorter amount of time.
Users can subscribe to your RSS feed in their favorite RSS reader and receive your new posts automatically. Popular RSS readers are Feedly and Feeder.
As a site owner, you get instant distribution of new content and a way for readers to subscribe to you without having to give up their email address, which some people don’t like to do.
While you still want to focus most of your efforts on building your email list, offering an RSS feed subscription improves user experience by giving privacy-conscious people another option for subscribing to you.
When considering an RSS feed, there are a few best practices you should follow:
- Decide if you want to show full post content or excerpts. If you write long content (over 2,000 words) you should most likely choose to feature only excerpts in your RSS feed.
- Make sure your feed includes images, otherwise your subscribers could be missing out on valuable infographics or other graphics required to understand the post.
Setting up your RSS feed with Feedburner (Google’s own RSS management tool) helps notify Google that you have a new blog post or page that’s ready to be crawled and indexed.
To create an RSS feed for your site, head over to Feedburner. Sign in with your Google account.
Enter your URL into the box and click Next.
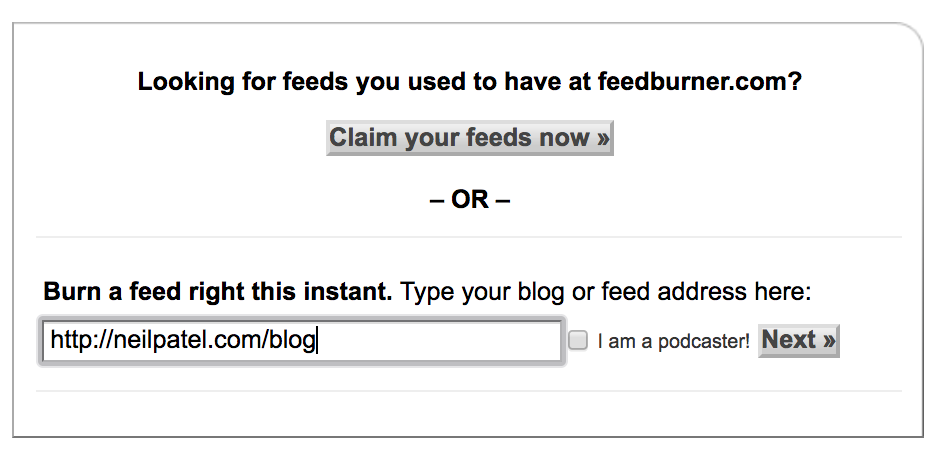
Give your feed a title and a Feedburner URL (this will be the public address of your RSS feed).
You’ll then see a success message with your new Feedburner URL. To get people to subscribe to it, just link over to that URL.
For example, you could have a button on your website saying “Subscribe via RSS” and link to that URL.
Step 15: Submit Your Website to Directories
You probably already know that submitting your new URL to blog directories can help your site “get found” by new potential users. Didn’t I just tell you not to do that a few steps ago?
Here’s the thing — it can your website be indexed faster — if you go about it the right way.
Once upon a time, free blog directories littered the digital landscape. There were literally hundreds – if not thousands – of these sites and most provided little to no value to blog readers.
The quality problem got so bad that, in 2012, Google purged many free site directories from its index, properly dropping the rankings of web pages with little content value.
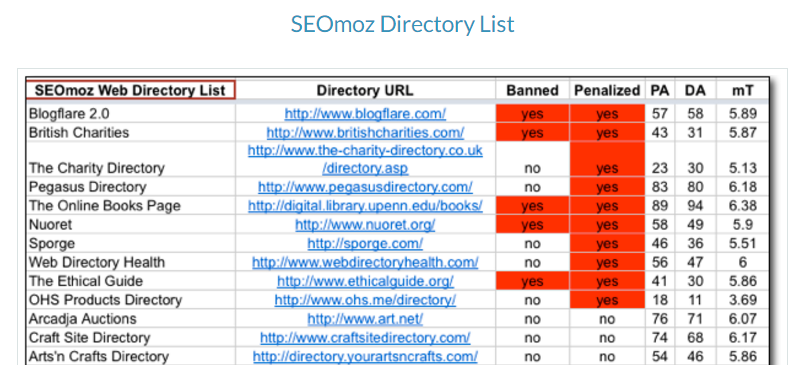
Moz examined the issue by analyzing 2,678 directories, finally concluding that “[o]ut of the 2,678 directories, only 94 were banned – not too shabby.
However, there were 417 additional directories that had avoided being banned, but had been penalized.”
So what’s the answer?
If you’re going to submit to directories, then make sure you only submit to decently ranked and authoritative directories.
Best-of lists of directories compiled by industry and authority blogs can help you weed out the good from the bad, but make sure the list you’re using is current.
For instance, this one from Harsh Agrawal has been updated as recently as 2019.
Other options that you might want to explore are TopRank, which has a huge list of sites you can submit your RSS feed and blog to; Technorati, which is one of the top blog directories around; and — after you’ve published a decent amount of high-quality content — the Alltop subdomain for your niche or industry.
Submitting to high-quality sites with decent Domain Authority ratings can not only open your content up to a whole new audience but also provide incoming links that can nudge the search engines to crawl and index your site.
An easy way to submit your site to several directories at once is to use a free service called Ping O Matic.
Ping O Matic notifies directories that your website has changed, and that they should go index it. It takes about 30 seconds to do, and here’s how.
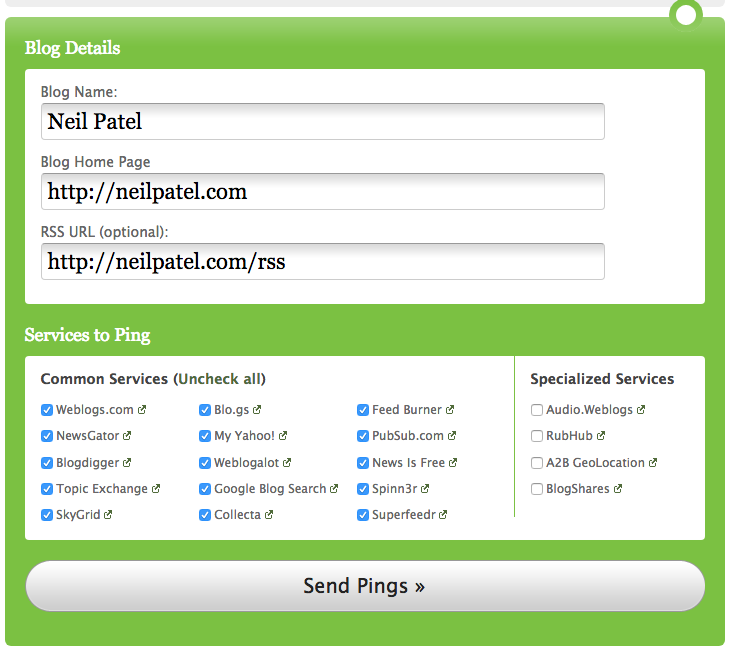
Fill out your blog name, homepage URL and RSS URL (if you have one), like this. Under Services to Ping, select the directories that make sense for your site:
Click Send Pings and you’re done.
Step 16: Check for Google Crawl Errors Frequently
This step is really important for maintaining your indexing frequency. I like to check for crawl errors at least once a month for my websites.
To check for crawl errors, open up Search Console.
On the left, click on Settings > Crawl Stats > Open Report.
The crawl stats page is where you find out how often Google is indexing your website, and it’s definitely something to keep an eye on.
For example, if my results are going up that meaning Google is indexing me more often now — a good thing. But if your graph is trending downward, that may be a sign you need to post more content or submit a new sitemap.
Next, look under “Index” and click “Coverage.”
This screen will show you any errors the Googlebot ran into when crawling your site, like 404 errors.
Here’s what you should be monitoring at least once a month:
- Crawl errors
- Average response time
- Crawl stats
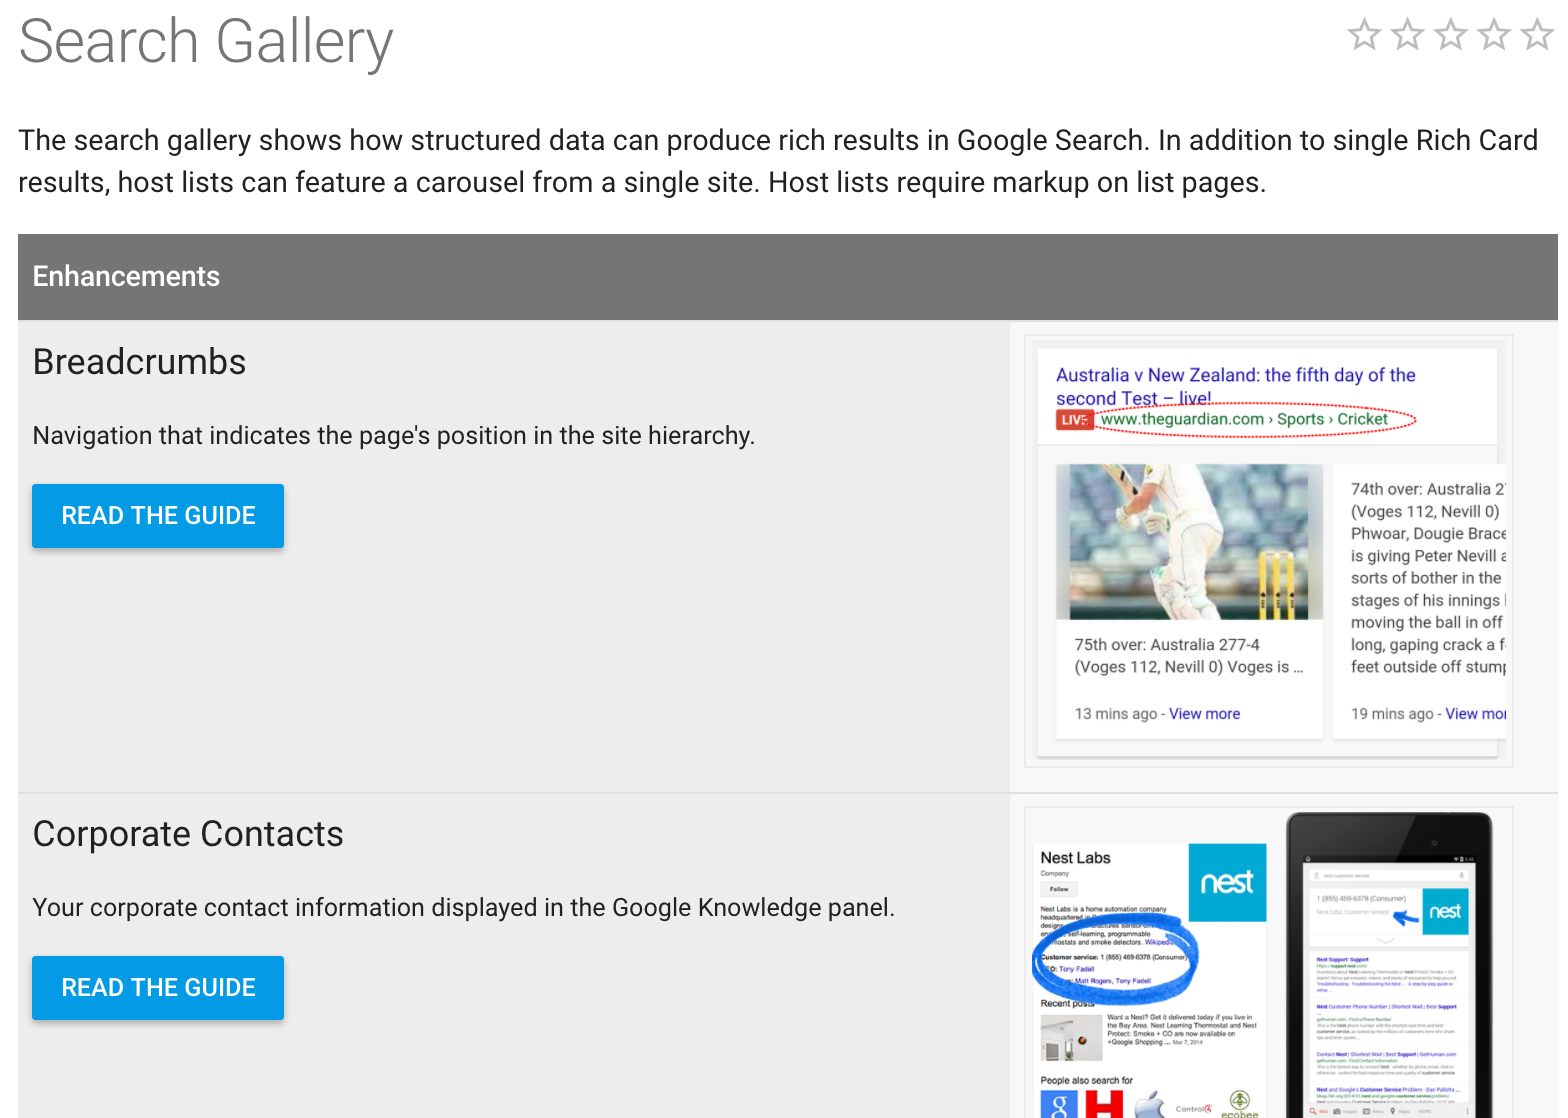
Another great tool to take advantage of is the Structured Data Tester. Google uses structured data to better understand what your website is about.
Structured data basically means you’re providing relevant information to Google to help answer users’ questions.
Here’s an example. I searched for concerts near me.

This website used structured data to tell Google these listings would be helpful for me, and they display underneath their normal SEO page title and description.
So how do you get that too?
It’s pretty advanced, so this may be another item you want to outsource to a developer.
You can see all the options for structured data in Google’s Search Gallery.
Google also has a simplified tool for helping non-developers add structured data to their sites. Go to the Structured Data Markup Helper, and enter your website information.

Then you just have to highlight the element on the webpage that you want to turn into structured data.
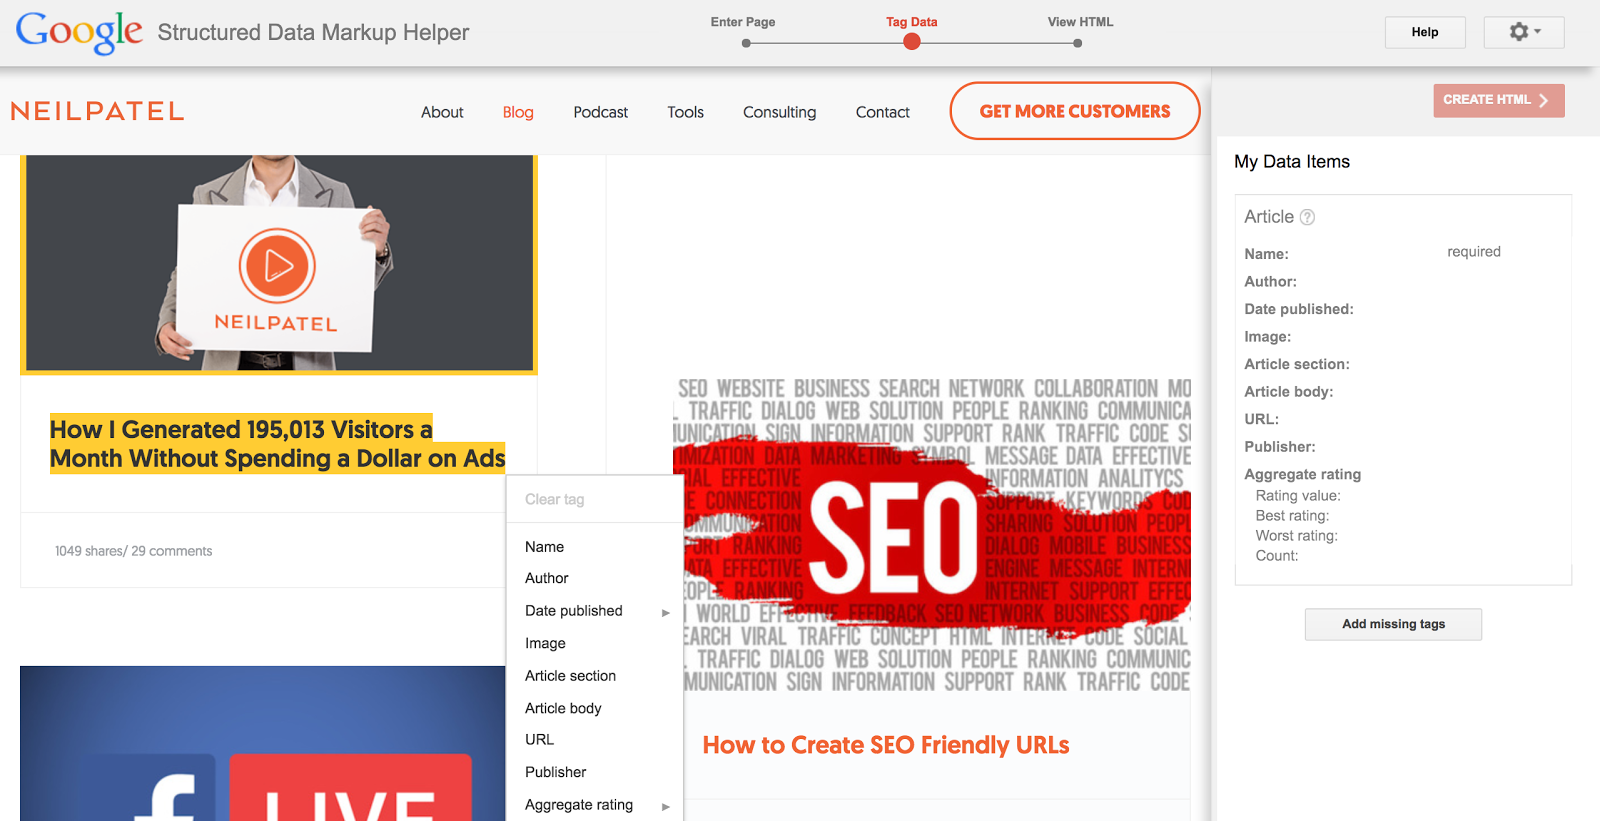
From the menu that pops up, you can add attributes like Author, Date Published, Image, URL, Article Body and so on.
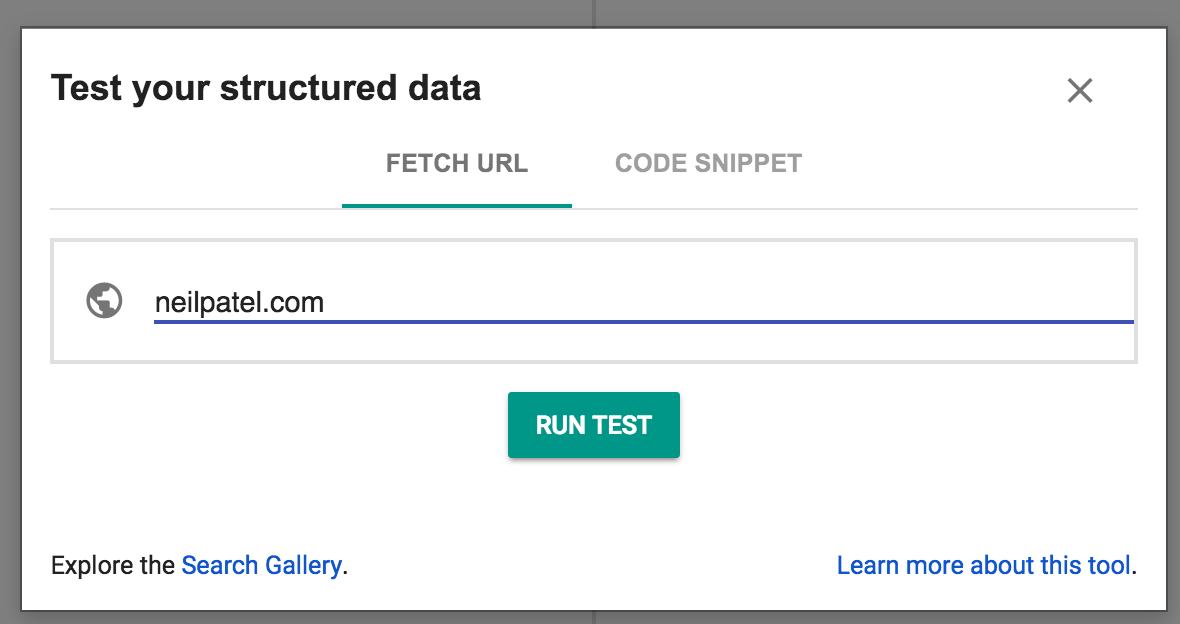
If you’ve implemented structured data, you can use the testing tool to validate it.
Again, this is pretty complicated stuff, so unless you’re a developer, it’s probably best to hire a professional to take care of this for you.
Step 17: Make Sure Pages that Shouldn’t be Indexed Aren’t
There are some pages you don’t want Google or other search engines to index. Here are the pages you don’t want to show up in search:
Thank you pages: These are usually pages that someone lands on after signing up for your mailing list or downloading an ebook. You don’t want people to skip the line and get right to the goods! If these pages get indexed, you could be losing out on leads filling out your form.
Duplicate content: If any pages on your site have duplicate content, or slightly varied, like a page you’re doing an A/B test for, you don’t want that to get indexed.
Say, for instance, that you’ve got two pages with the same content on your site. Maybe it’s because you’re split-testing visual features of your design, but the content of the two pages is exactly the same.
Duplicate content, as you probably know, is potentially a problem for SEO. So, one solution is to use your robots.txt file to instruct search engines to ignore one of them.
Here’s how to make sure that pages you want to exclude don’t get indexed.
Option 1: In Your robots.txt File
Remember that robots.txt file we made back in Step 10? You can add directives in it to tell search engines not to index a file or a whole directory. That can be handy when you want to make sure an entire section of your site remains unindexed.
To add this, open up your robots.txt file.
See Step 10 for how to do that if you need a refresher.
To block a page from being indexed, enter this code into your robots.txt file.
Disallow: /nameoffolder/
This blocks everything in that folder. Alternatively, you can just block one single file.
Disallow: /folder/filename.html
Save it, reupload to your server and that’s it. For more information on robots.txt files, check out robotstxt.org.
Option 2: Use a nofollow or noindex Links
This option is very simple. When you’re creating a link on your site, just add either a nofollow or noindex tag to the <a href=””> link.
First, let’s cover what they mean.
Nofollow: Tells Google not to crawl the links on that page.
That means is if I link over to your website from neilpatel.com and use a nofollow link, none of my link juice (or, domain authority) will be passed over to you.
Noindex: Tells Google not to index the page, even though the spider can see it. It won’t be added to search results.
You can use both at the same time.
Here’s an example.
If you’re linking over to a special landing page for an event you’re having for VIPs only, and don’t want that page to appear in search results, you would link to it with a noindex tag.
That would look like this: Check out my <a href=”/neilscoolevent.html” rel=”noindex”>super cool event</a>.
Even if people search for “Neil’s super cool event” in Google, that page won’t show up.
(You will, however, get a lot of Neil Diamond tribute concert options.)
Most often, you’ll want to use the noindex tag. You usually only want to use nofollow for affiliate links, links someone has paid you to create, or you receive a commission from. This is because you don’t want to “sell links”.
When you add nofollow, it tells Google not to pass on your domain authority to those sources. Essentially, it keeps the web free of corruption when it comes to linking.
If you want to make sure an entire page is excluded from search results from all sources, instead of just including the nofollow or noindex tags in your links, follow the steps below.
First, open up the page’s HTML.
If you use a CMS (Content Management System) like WordPress, you can edit this file using Yoast to add a noindex tag.
If you don’t have a CMS like WordPress, you can download the page you need to edit via FTP.
Not sure how to use FTP? Jump back to Step 2 where I explain it!
Click on the page you’re wanting to exclude from search results, and download it.
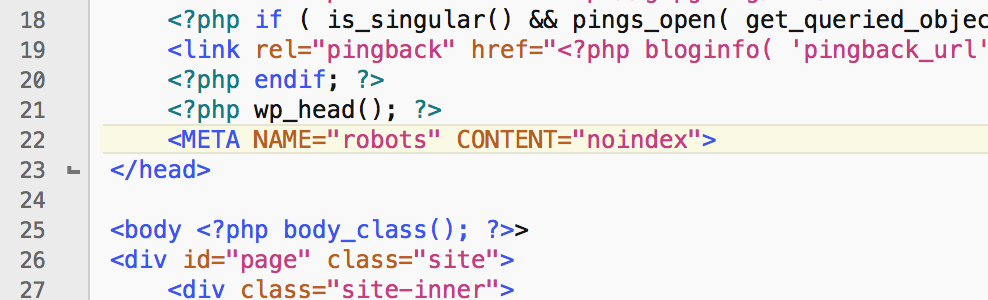
Open it up in a text editor. Notepad for Windows or TextEdit on Mac are great for this. Look for the </head> tag, like this:
Right before that </head> tag, you want to insert ONE of the following pieces of code.
If you want the page to be excluded in search results, but still follow the links on the page, use:
<META NAME=”robots” CONTENT=”noindex”>
If you want the page to be included in search results, but for Google to not follow the links on the page, use:
<META NAME=”robots” CONTENT=”nofollow”>
And, if you want the page to be excluded from search AND for Google to not follow links, use:
<META NAME=”robots” CONTENT=”noindex,nofollow”>
Like this:
Step 18: Make a Plan for Updating Old Content
So what have we learned about indexing so far?
Every time you update your website, Google wants to crawl it more often.
A great way to capitalize on that is to make a plan to regularly update your old content.
That’s actually what I’m doing right now with this mega post!
This post was originally published in 2015 and I make a point of updating it at least every few months, or when major Google changes happen, to keep it current.
Information gets outdated easily, especially in the fast-paced marketing world. Each month, I make a list of my older posts and select a few to update with fresh information and tips. By editing at least a few posts a month, I ensure my content stays relevant and helpful.
For the best impact on your indexing speed, try and update your website at least three times each week. Those three things could be posting one new blog post and updating content in two old posts.
Updating at least three times a week tells Google it better check in with you often to ensure it has the latest version of your site.
All that indexing, and new information, means that updating your old posts can increase your organic search traffic by 111%!
Here are some easy ways you can update your old content.
Check for outdated facts or terms: For example, this post referred to Google Webmaster Tools when it’s now called Search Console.
Link to fresh information sources: If you wrote a post about SEO in 2013 and used data from the same year in your post, that’s fine back then, but not in 2017. Update your points and supporting information to be recent.
Broken links/new links: Check for broken links and fix them, or change any links in your post to better sources, if needed. For example, I may redirect old links to fresh, new content on my own site.
Link to your other content: Include links to new posts or relevant content you’ve published since the original post. Most bloggers do it like this:
Related: Is SEO Dead?
Update your viewpoints: This is important. Go through old posts and update your recommendations to more current ones, if needed. Things change! So should the solutions you’re offering people.
Conclusion
I hope you enjoyed this in-depth guide to getting your website indexed!
I know it’s a lot to take in. I didn’t know half this stuff when I started blogging.
With my first blog, I installed Google Analytics and that was it!
Of course, back then we didn’t have as many options for improving our SEO ranking or indexing, and it wasn’t driven by a complex algorithm like it is now.
That’s why I wrote this guide. It’s so important to educate yourself on SEO and indexing when starting a new website, especially with all the competition out there.
It is possible to rank on page one and “beat the big guys”, but it takes a lot of work and research to get there.
The best advice I have is this:
Keep learning and staying on top of industry news. Things change so quickly, especially when it comes to search engines.
Do your research on SEO and double-check any new suggested technique with your own independent research before trying it.
Mmake sure you’re updating your site frequently — not just with new content, but updating old posts too. It keeps Google coming back to crawl your site frequently and keeps those posts relevant for new visitors.
Next, make a digital marketing plan.
Write down your content marketing plan, including how you’ll monitor your indexing, analytics, and how you will update old information on your site. It wouldn’t have been possible for me to grow as quickly as I did without a written plan.
Finally, get professional SEO help if you need it. Not all business owners have the time to stay on top of marketing, especially since it changes so fast. A professional can often get results much faster — and actually save you money in the long run.
What crawling and indexing tactics have you tried? What were your results?
The post How to Get Google to Instantly Index Your New Website appeared first on Neil Patel.
About us and this blog
We are a digital marketing company with a focus on helping our customers achieve great results across several key areas.
Request a free quote
We offer professional SEO services that help websites increase their organic search score drastically in order to compete for the highest rankings even when it comes to highly competitive keywords.
Subscribe to our newsletter!
More from our blog
See all postsRecent Posts
- Web Hosting September 26, 2023
- Affiliate Management September 26, 2023
- Online Presence Analysis September 26, 2023