Disclosure: This content is reader-supported, which means if you click on some of our links that we may earn a commission.
Buying a domain name is one of the first steps to launching a website.
But finding the perfect domain for your site and registering that domain can feel like a tall task if you’ve never been through this process. Fortunately, domain registration isn’t that difficult. You just need to follow a few simple steps.
Throughout my career, I’ve bought a lot of domains—too many to count. Some of those experiences were significantly better than others.
This guide will explain my two favorite ways to buy a domain; one of those methods will even get you a free domain. I’ll also cover the differences between these options in greater detail and explain how to buy a premium domain.
Let’s dive in.
How to Buy a Domain Name With Bluehost
Bluehost is a web hosting provider. In fact, they are one of the most reputable and reliable web hosts on the market today. More than two million sites across the globe are hosted by Bluehost.
But Bluehost also provides domain registration services. If you use Bluehost for web hosting, you’ll get a free domain for one year.
Since you need a hosting plan anyways, you can use Bluehost as a one-stop-shop to bundle hosting and domain registration into a single package. This is a great option for beginners starting a new website from scratch.
Step #1 – Navigate to Bluehost.com
The first step is easy. Just make your way over to the Bluehost website.
From here, scan the menu and select “Hosting” at the top of the screen.
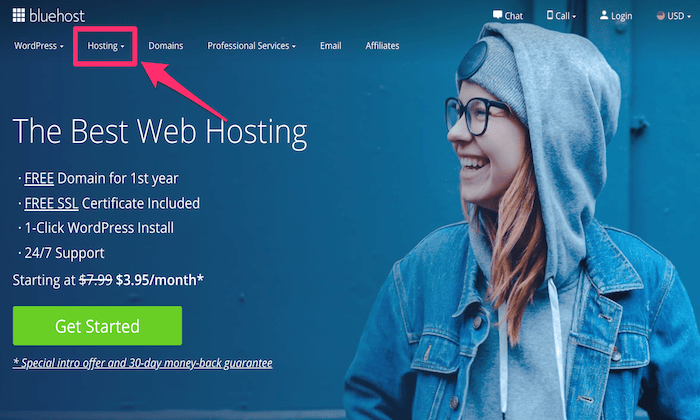
I’ll say it again; click HOSTING. Do not click on the “Domains” menu option.
If you click on the latter, you won’t be bundling your hosting plan with domain registration, which defeats the purpose of using Bluehost (and you won’t get the domain for free).
Step #2 – Choose a Hosting Plan
The hosting menu will expand and present you with three different options:
- Shared Hosting
- Dedicated Hosting
- VPS Hosting
Shared hosting will be the best option for 99% of people starting a new website. So go ahead and select that from the expanded drop-down menu.
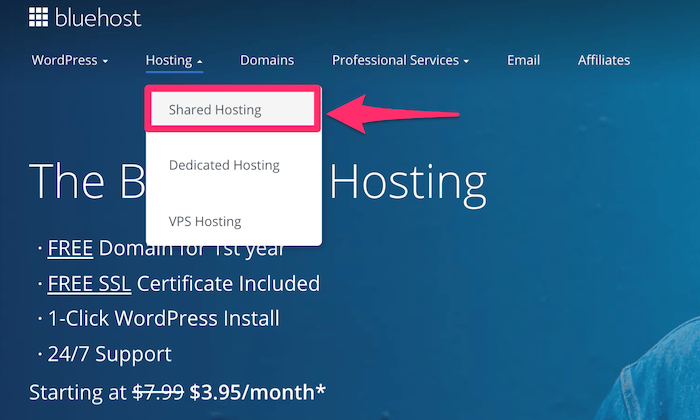
You’ll still be able to bundle your hosting plan and domain registration (and get a free domain) if you select dedicated or VPS, but most of you won’t need to worry about that right now. Just stick with shared hosting.
Bluehost offers four different shared web hosting plans to choose from—Basic, Plus, Choice Plus, and Pro:
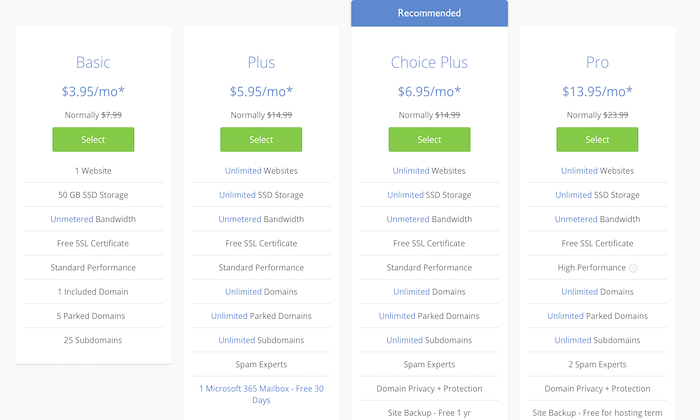
If you’re launching a small personal site, the Basic entry-level plan starting at $3.95 per month should be fine for you. For those of you launching a site for your business, I’d go with the Choice Plus plan, at a minimum.
The extra features that come with this plan are worth the few extra bucks per month.
To continue, just click the “Select” button under the plan that fits your needs.
Step #3 – Register Your Domain
Once you choose a web hosting plan, Bluehost will automatically prompt you to set up your domain. You’ll be presented with two different options here:
- Create a new domain
- Use a domain you own
You’ll want to use the “Create a new domain” option to search for available domains.
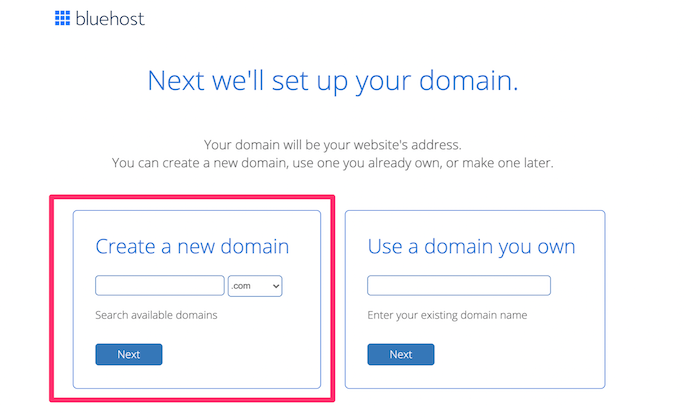
Simply enter the domain you want to buy into the search bar and choose your domain extension (.com, .net, .blog, .biz, .info, .store, .co, .us, etc.).
In the vast majority of cases, you’re going to want a .com extension. The only reason why I’d consider an alternative domain extension is if the .com domain is taken.
For example, if you try to create a domain using nike.com or apple.com, those will obviously be unavailable. But a different extension might be available for purchase.
So if you’re set on a name, you could always get an alternative extension in the meantime while you figure out how to buy the .com extension. I’ll explain how to buy domains that have already been registered in greater detail later in this guide (although you probably won’t be able to buy Nike or Apple).
Another reason to consider an alternative domain extension is the price. Lots of these extensions will be cheaper than a .com domain.
For a small blog, side project, or personal site, that’s fine if you want to save a few dollars. But businesses should always register a .com domain.
Step #4 – Finalize Your Contract
Once you’ve chosen an available domain name, simply create your Bluehost account and select your plan terms.
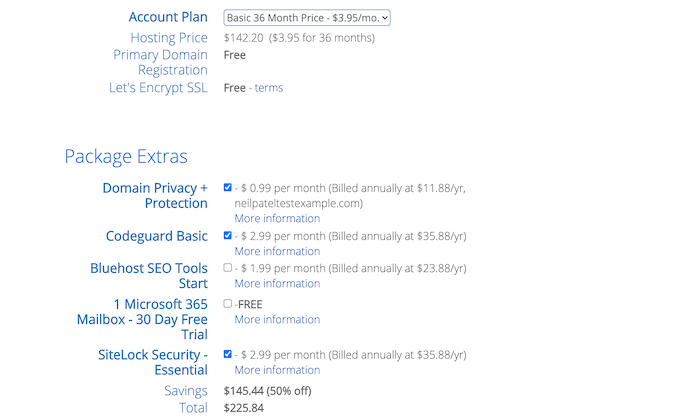
Definitely make sure you get “Domain Privacy + Protection” located in the “Package Extras” section. Otherwise, your name, email, phone number, and address will all become available on a public database. It’s well worth the extra $0.99 per month.
The other options, like SiteLock Security and Codeguard Basic, are up to you. I’d get them, but there are alternative third-party services out there that you can use for site backups and security. I think it’s just easier to get them now.
That’s it!
Once you enter your payment details, your hosting plan and new domain purchase will be finalized. Your domain name is free for the first year of your contract.
How to Buy a Domain Name With Namecheap
The market is flooded with domain registrars. But Namecheap is definitely my favorite. It’s super easy for anyone to buy a domain using this registrar, even if it’s your first time.
This method is a bit more straightforward than using Bluehost, only because you’re not bundling any other services—Namecheap is strictly for buying a domain.
The entire process can be completed in just three quick steps.
Step #1 – Visit Namecheap.com
Obviously, the first thing you need to do is make your way over the Namecheap website.
From here, you can search for your domain directly from the homepage.
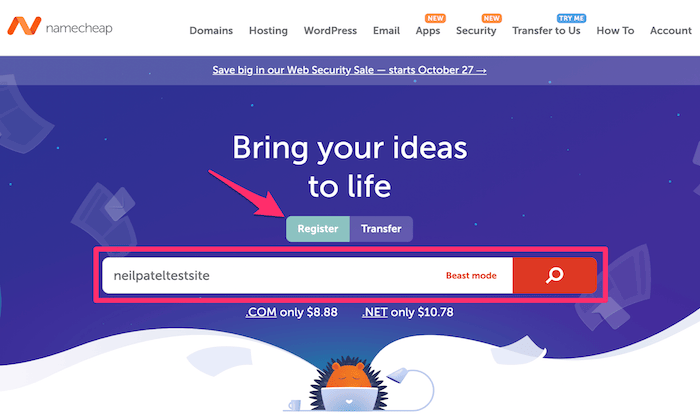
Enter your desired domain name into the search bar, which can be found in the center of the screen.
Make sure that “Register” is toggled above that search bar. The “Transfer” option is made for people who have an existing domain and want to switch registrars—that’s not for you.
Click the search icon to continue.
Step #2 – Choose Your Extension
As a domain registrar, Namecheap offers an extensive list of domain extensions.
You’ll have the option to choose from things like .fun, .vip, .studio, .health, .xyz, .lol, .design, and hundreds of other extensions. But in most cases, choosing a .com extension will be your best bet.
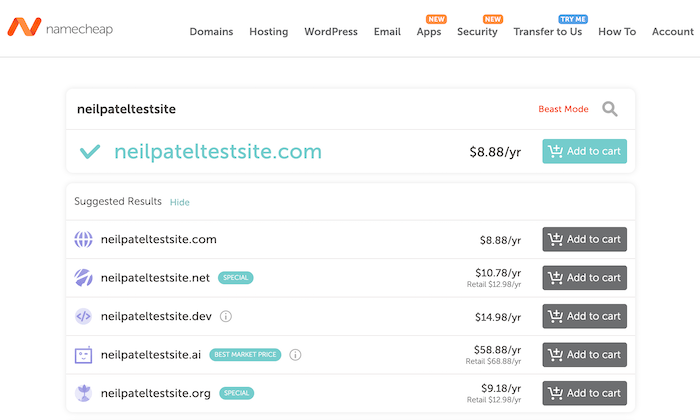
Just click the “Add to cart” button next to the extensions you want and then checkout.
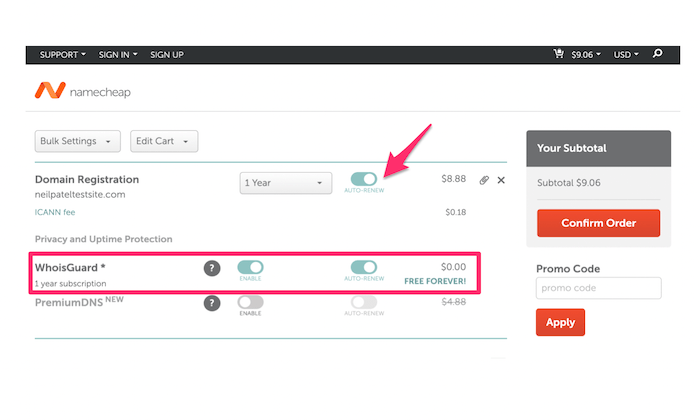
Step #3 – Confirm Your Order
When you’re buying a domain directly from a domain registrar, you can skip all of the extras. You won’t need an SSL certificate, professional email, or anything else. You’ll be able to get that from your web hosting provider.
Definitely make sure you have WhoisGuard enabled. This protects your personal information from being available to the public. Some domain registrars make you pay extra for this, but Namecheap offers it free forever.
Turn on “auto-renew” for your domain registration as well. Otherwise, you’ll have to renew it manually every year, which puts you at risk for the registration lapsing.
It’s that easy!
Once you confirm the order, you’ll be asked to create a Namecheap account. After you enter your payment details and finalize the purchase, the domain is yours.
Ways to Buy a Domain Name
Generally speaking, there are two main ways to buy a domain name. Both of which have been covered above—domain registrars and hosting providers.
There are pros and cons to each method, and the process for each one is very different.
I’ll quickly explain the differences between these options so you can figure out which one is the best choice for your website.
Buying a Domain From a Standalone Domain Registrar
In most cases, going directly to a domain registrar like Namecheap will be your best option. As the name implies, these platforms specialize in domain registration.
Buying domains directly from a standalone registrar will be faster than alternative methods. That’s because you’re not bundling other services, so the process is more direct.
Domain registrars also make it easier to buy domains in bulk. So if you’re in the market for more than a single domain, definitely go with a registrar.
If you want alternative extensions, domain registrars will offer significantly more options. While I typically don’t recommend anything other than a .com domain, some of you might want to browse through hundreds of alternative extensions.
Transferring domain names with a registrar is also easier than using a service that doesn’t specialize in domain registration. So if you want to transfer your domain or think you might want to transfer it in the future, use a domain registrar.
It’s usually cheaper to buy domains directly from a registrar. For starters, the domain itself will likely be less expensive. But the best registrars, like Namecheap, include WhoisGuard protection for free with the purchase of a domain. You probably won’t get that from a hosting company.
The downside of getting your domain from a registrar is that there’s an extra step in the process. You’ll still have to get web hosting elsewhere.
Buying a Domain From a Web Hosting Company
For the most part, domain registration and web hosting should be kept separately. Bluehost is the exception to this rule. So if you want to bundle your domain name with a hosting plan, Bluehost is really the only option to consider.
There are a couple of main reasons why you’d go this route.
For beginners who are new to the world of web hosting and domain registration, getting everything under one roof is just easier. It’s less steps, and you can manage your hosting plan and domain name from a single account.
Furthermore, Bluehost gives you a free domain name for one year. You’ll never get a deal like that from a domain registrar.
But getting a domain from a hosting provider isn’t ideal if you want to buy domains in bulk. It’s fine for a single domain, but beyond that, it gets messy. You also won’t have as many options for alternative extensions (if you want something unique).
Most web hosting providers will also charge you extra for domain privacy + protection, whereas you can get this for free from a domain registrar.
How to Buy a Premium Domain
Premium domains are a great way to stand out online. They are great for branding and marketing purposes as well.
What is a premium domain?
A premium domain is typically short, memorable, and easy to spell. High-quality domains have a high search volume and are closely associated with an industry, service, or topic. They also have TLDs (top-level domains) like .com, .org, or .net.
Premium domains are in high demand. So they’ll typically cost a bit more to register. The process of buying a premium domain can be different as well since it’s not always clear if the domain is actually for sale. Here’s what I mean.
Let’s say you try to register a premium domain from a domain registrar or hosting company. Just because it says “unavailable,” that doesn’t necessarily mean that it can’t be acquired. These are the steps for buying a premium domain:
Step #1 – Determine if the Domain Seems Attainable
If a domain is unavailable from a registrar, try going directly to that website and see what you find. If there’s an active website or business using that domain, it might be tougher to acquire.
But if you don’t see an active site, there’s a good chance that domain will be for sale.
Here’s an example for management.com:
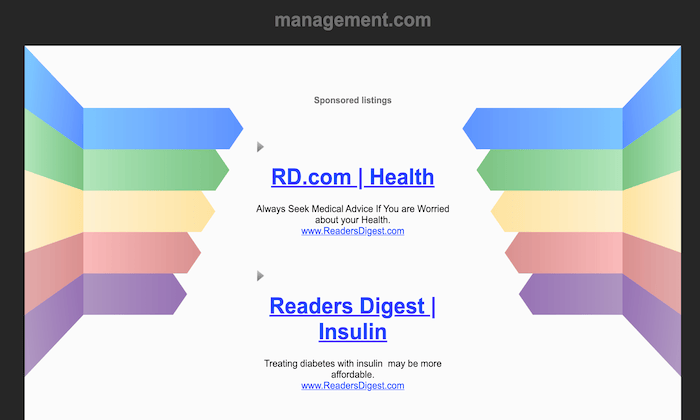
Clearly, not much is happening on this site. So if you wanted this premium domain, there is a pretty good indication here that it’s for sale.
In some cases, you’ll even see text like “buy this domain” or information that says “this domain might be for sale.” All of these are good signs that the domain is attainable.
Step #2 – Find Out Who Owns the Domain
There are two ways to complete this step:
- Figure it out on your own
- Hire a domain broker to do it for you
Doing it on your own can be tricky. You could run a quick WHOIS lookup, but most people won’t have their personal information listed. Using Google to your advantage can be helpful. Some domains might be linked to another website or social media profile. You could potentially find the owner that way.
Personally, I’d recommend using a broker. Sedo is one of my favorite domain marketplaces and brokerage sites.
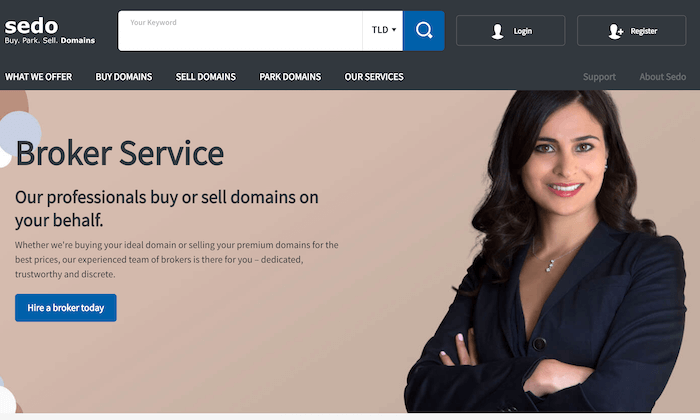
Brokers can almost always find out who owns the domain because they have such a massive network. They’ll determine if the domain is actually for sale and how much the seller is asking for. Your broker can even handle the negotiations on your behalf.
The downside of using a broker is that you’ll have to pay a brokerage fee. But in most cases, you’ll only have to pay if the sale actually goes through.
Other great places to find a premium domain online include:
If a domain is for sale, you’ll be able to get the ball rolling with Sedo or one of the other options listed above.
Step #3 – Negotiate and Buy
Often times, the listing price of a premium domain can be negotiable. If you think it’s a fair price and fits well within your budget, you can speed up the buying process by offering the asking price in full.
If a domain is in high-demand, this also increases your chances of securing it before someone else makes a better offer.
But in some cases, domains can be outrageously priced. You need to ask yourself if it’s actually worth the cost. Sometimes you might be better off just looking for another domain. Unless a certain domain is crucial to the success of your business, it can be tough to justify a five or six-figure listing price.
Don’t be afraid to walk away during the negotiation process. If it’s not meant to be, you can move on or try again at a later time. This is also another reason why it’s helpful to have a broker.
Step #4 – Transfer the Domain
Once the domain has been purchased, the final step is transferring it to your domain registrar. Again, I recommend Namecheap.com for this because it’s so easy.
Make sure you turn on the auto-renewal after the transfer. Otherwise, you’ll have to worry about manually renewing your domain each year. If you forget and the name lapses, your premium domain could be up for grabs on the open market.
The process is officially complete when you see the domain sitting inside of your domain registrar account. Now you can finally rest easy knowing that you’ve secured your premium domain.
How to Buy a Domain Name That’s Not For Sale
Not every premium domain will be available on a brokerage site or domain marketplace. But if you really want to pursue a specific domain, you still might have a chance.
Similar to the steps we took in the last section, you’ll need to figure out who owns the domain. If a domain isn’t for sale, this step should be a bit easier, and you can probably do it on your own.
Most domains that aren’t for sale will be linked to an active website. That site should have some sort of contact information on it. You can reach out directly to get in contact with the business owner or decision-maker associated with the domain.
Start with a general inquiry saying that you’re interested in buying the domain; don’t throw an offer out there just yet (or you could end up overpaying).
See what type of response you get and if the site owner is willing to sell. Unlike a premium domain that’s listed on a domain marketplace, you might have to dig a bit deeper into your pockets to buy a domain that’s not currently for sale.
If it’s absolutely imperative that you secure this particular domain, consider making the owner an offer that they can’t refuse.
Just be aware that this won’t always work. It’s like trying to buy a house that’s not for sale. You can knock on the front door and make a cash offer, but the homeowner might decide to stay put.
If they’re willing to sell, use a broker to make sure the purchase goes smoothly. Then immediately transfer that domain to your registrar after you obtain ownership.
Summary
Buying a domain name doesn’t need to be that complicated.
Even beginners and first-time buyers can complete this process in just a few minutes by following the step-by-step instructions explained in this guide.
Buying a premium domain might take a bit longer. But again, you can still make it happen by following the process I’ve outlined above. Good luck and happy buying!
The post How to Buy a Domain Name appeared first on Neil Patel.
About us and this blog
We are a digital marketing company with a focus on helping our customers achieve great results across several key areas.
Request a free quote
We offer professional SEO services that help websites increase their organic search score drastically in order to compete for the highest rankings even when it comes to highly competitive keywords.
Subscribe to our newsletter!
More from our blog
See all postsRecent Posts
- Web Hosting September 26, 2023
- Affiliate Management September 26, 2023
- Online Presence Analysis September 26, 2023